5.15.2012

Going from long sleeve to short sleeve

My husband and I have been in the military life for about a year and a half now and with that comes relocating to new climates on a regular basis.  I grew up in the mountains and always had a closet full of long sleeve shirts but I'm learning that while we're in the military it might be a good idea to have only short sleeve shirts and many cute sweaters!  In any case, if you have a shirt with long sleeves that you would like to make short sleeves here is a simple tutorial.  The shirt I'm using is great for this because it comes with cuffs on the end of the sleeve.  
 First I found a shirt in my closet that I wanted for my sleeve length.  Then I compared the length on the shirt and marked it on one sleeve.  Then I folded the shirt in half and cut both sleeves simultaneously. (to ensure that the sleeves matched in length)
 I then removed the cuffs with a seam ripper.  I would not recommend doing this without a seam ripper as pulling on the string or using scissors can damage the material.
 I then took the cuffs and pinned them to the bottom of my new sleeve length.  (Pin right sides together)
 Then sew the cuff on the sleeve.
And voila!


In retrospect I cut the sleeve length a little too long for my preference.  I measured at the bottom of the sleeve from the other shirt and that is incorrect because I didn't take into consideration the length of my cuffs and the sewn hem.  But I now have a quarter length sleeve and I still like the result!  

5.04.2012

Faux Bead Board Chunky Frame....

I have always liked the look of bead board. I've seen frames with bead board in them or made from bead board itself, but when I went to look at bead board at the home improvement store I realized I had a few problems. First, it comes in a big sheet, so I would need a big vehicle to get it home. Second, trying to wrestle it out of the truck alone once I got home. (I guess my 4 and 2 year old would be really helpful too) Third, it is really big and I wasn't sure how to cut it without having a table saw.

So, one night I was thinking about it and I came up with an idea. Make my own bead board look-a-like using paint sticks and bamboo skewers! I tried it and it totally worked! Here is a look at the finished product:
 This is an 8x10 frame, I pulled out the glass, then measured and cut the paint sticks. (I got these from Walmart, obviously, and the paint guy just gave them to me--he thought I was a little crazy, but I don't care.) I cut the paint sticks using a utility knife, just score each side and then break the end off. Same with the bamboo skewers (they come in a pack of like 100 for $1).

Then I lined them up in the frame; paint stick, skewer, paint stick, skewer.... and so on. The last paint stick had to be trimmed a little, but I just used the utility knife for that too. Then I glued them in using hot glue. Replaced the back of the frame. Then painted and distressed the whole thing.

I wanted the chunky layered frame look, but I wasn't sure how to attach the other frame to the front without making it too permanent--I like to switch out pictures a lot. And then I had a somewhat brilliant idea!
VELCRO! Yup, sticky back velcro dots. I put the scratchy side on the small frame and soft side on the faux bead board. It works GREAT! I can swap out the pictures whenever I want, the 2nd frame stays put and it was hard or complicated! I love how they turned out---I actually made 3 for our mantel.


5.02.2012

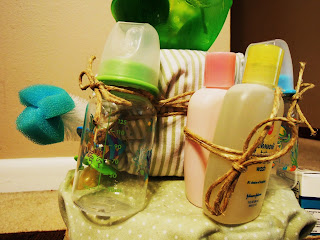
Diaper cake...again

I have featured a diaper cake before in one of my posts but since then I have changed a couple things and thought I'd post this diaper cake I made recently.  The last diaper cake I gave out I covered with cute pink fabric and when I gave it to the soon to be mother she excitedly asked me if the fabric was a baby blanket.  I sheepishly answered that it was just fabric for aesthetic purposes.  And that was when it occurred to me, why not make blankets to cover the diapers?  So the green striped and polka dotted fabric are receiving blankets, which makes this gift that much cooler for a baby shower!  The cake topper includes a baby bowl, baby spoon (that turns white when food is too hot!) and baby socks and 3 diapers tied with twine.  Th second layer has baby shampoo and lotion, two baby bottles, a pacifier, and bottle cleaner.  The third layer has diaper rash cream, and gas drops.  Personally the diaper cake would look much cuter without all the add ons dangling from the side....but when it comes to baby showers I think more is always better. New moms can attest that some supplies were invaluable and so I always try to include those essentials with my gifts.  Nothing says welcome to motherhood (in a helpful way) like gas drops, diapers, and a bottle cleaner!  (in my opinion!!!)  I hope you enjoy!