Pages

12.21.2011

Save those Christmas Cards

And recycle them into a Christmas ABC book!
When we were expecting our first daughter, my husband's mom gave us an ABC book that she made out of Christmas cards. She had made one for each of her children when they were young and was passing down my husband's to us. I decided then I wanted to make one for my nephew. I started collecting our Christmas cards. And my parents'. And my husband's parents'.


Five years later, I had enough cards.  I'm telling you...it took forever because so many people send out family picture cards or Christmas emails.  So now it is no longer just my nephew in that family, but 2 nephews and a brand new niece.  I do have some left over cards, but you need a ton to be able to choose for each letter and then the number.
My husband's mom made hers in 1" binders with page protectors and red and green paper.  I made mine in an 8x8 scrapbook with page protectors (had to buy 2 refill packs to add to it) and Christmas scrapbook paper.  Both are super easy.  Hers has more room on a page and is cheaper by far.

The one I made for my nephews and niece

The one made for my husband

Here are some hints I used/realized:
  • Group similar cards (i.e. angels, snowmen, etc.)
  • Leave letters that have multiple words (S is for Shepards, Star, Snowman, Snow, Snowflake, etc) for last
  • Use a business card template for the wording, I only had to cut a few smaller
  • Wish I would have used less patterned paper for the backgrounds, some are too busy to read
  • Let glue dry for a at least 45 minutes to ensure it doesn't make the page protectors go wavy.  (You can see it in mine on pages "X" & "Y")
  • I had to go to the dollar store and pick up a few cards for letters I didn't have, like "Y" (yule log).
The kids loved these books and gazing at each picture.  It does take some effort in collecting and sorting out each letter, but it is pretty simple after that, just cutting and gluing.

Here is the Christmas ABC document I created to help me sort out cards.  It is just what I gathered from here and there so it is rough.  There are repeats, some very closely worded, and some without rhymes.  You can really do whatever you can come up with.  The ones in bold are the ones I ended up using with the cards I had.

Start collecting those Christmas cards now (ask family and neighbors for the fronts of theirs too), or your kids might be graduating from high school by the time you get enough.

Heads up: Also you may be able to score cheap some cards the day after Christmas at the store.  And  I saw a Christmas card at Wal-mart that had children holding hands around a world - perfect for letter "U".  Don't know how much it was though.  Some cards are way too expensive.

12.09.2011

Boredom Buster

***Be sure to check out Keri's Guest Post at Darling Doodles***

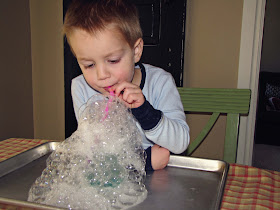
It has been really cold at our house, which means that our 2 (very active!) boys have been stuck inside and we are all driving each other a little crazy. This is actually something that my grandma would let us do when we went to her house and we always loved it. 

All you need is a rimmed baking sheet, pint mason jar, a straw, dish soap and water. 
Fill the mason jar about half way with water (I used warm water because it is softened and makes TONS of bubbles) then add a generous amount of liquid dish soap. Place the mason jar in the middle of the rimmed baking sheet and start blowing with the straw. Make sure and remind them to BLOW not suck. My 2 year old did a great job and I think he only tasted bubbles once before he realized that it was for play not eating.

 The bubbles will spill over the side and they can see how tall they can get them to be or who can make the biggest bubbles. The bubbles on the baking sheet will eventually pop and then you can carefully dump the soapy water back into the jar and do it again.


12.02.2011

Christmas Wreath...

I love decorating for Christmas, it is my favorite holiday, and I like to do a few new things every year. This week I worked on this wreath to put above our fireplace. It was really simple and worked up pretty fast.

Here's what you need:
Hot Glue Gun and Glue
Cardstock or Cardboard for wreath base
Scrapbook paper (I used 4 sheets of double sided Christmas paper)
Large Circle Punch (or scissors and patience)

The first thing I did was make my base. I had originally dreamed this wreath would be made on a foam wreath form. Unfortunately, the store I usually get them from doesn't carry them anymore and the next closest store is and 1 1/2 hours away. So I improvised. I used a piece of heavy brown cardstock. I used a large dinner plate to trace the first line and then a bowl for the center line. Then I just cut it out with my scissors.
 Next you need to make the 'leaves'. I used a large (3 inch-ish) cirlce punch. You could free hand cut them if you are patient enough or use a craft cutter. The punch worked great for me. I cut a large circle first.


Then slide the circle back into the punch, but only part way to make the leave shape. I could get 3 large leaves out of each circle or 4 smaller ones.


To give the leaves shape, just pinch one end of the leaf. Then start gluing leaves around the outside of the wreath edge.
 This is how the first layer looks around the outside edge.
 The second layer I flipped the leaves the other way and glued them in bunches of 2 leaves and then 3 leaves. Layer 4 was the same direction as Layer 1, but I put the leaves on an angle overlapping the the previous one. And the last Layer, over lapped the previous leaf and then I folded just a little bit under and glued towards the back of the wreath.


And here is the finished wreath!. I hung it with a thin gold wire to the front of an antique cupboard door and then set it on our mantel. I hope you all have a fun time decorating and creating for Christmas!