Showing posts with label Keri. Show all posts

1.31.2012

Butterfly wall decor

Oh Pinterest. Who really can be bored today now that we have Pinterest? You don't even have to do any of the crafts. You could just oogle all day long at things that you could, would, want, hope, to do. I do this thing where I try to hold out as long as I can when I really want chocolate (I always hope to make it after the kids are in bed....) and I find myself doing the same thing with Pinterest. How long can I resist before I go back and spend the rest of the afternoon sifting through the goodness?!

And on that note here is a craft for my wall that I found on Pinterest. When you're renting you're so limited and have to be clever in how to make your home more livable!


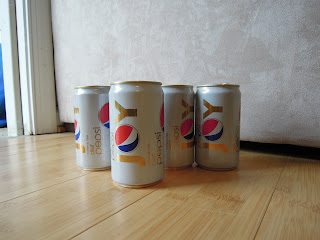
I saw this idea and thought I'd give it a try. In the picture I found they made their butterflies out of soda cans. I don't drink nearly enough soda to attempt this any time soon so I made my butterflies out of card stock. I chose white although I preferred black. I would suggest picking a color and sticking with it because I cut out about 50 butterflies and that took several days. I painted about half of my butterflies black when I had this idea to paint half of them black and look like the white ones escaped out of the paint. I kind of like how it turned out. I may make some of the escaped white ones colored as well and make them a bit wild. If I do I will post the updated version. But anyway, this is pretty straight forward. I printed off some butterfly shapes I liked and had about 8 different shapes. Then I traced 50 butterflies, cut them out and pinned them on the wall with sewing pins. (Poke right through the paper and into the wall) I let them stick out a little to give them a little dimension. In the future I would have glued them to the push pins first because they had a tendency to tilt downwards when I didn't want them to. To get the design I wanted I used a pencil on the wall to draw it out and then pushed the pins along the design. Overall I'm pretty pleased with how it turned out.

11.29.2011

Christmas Ornaments

Growing up with 8 siblings required our family to be a little creative when it came to finances. One thing my mother did was make our Christmas ornaments. I really enjoy having a very beautifully decorated tree (that matches) and looks gorgeous but sometimes it is fun to have a very personalized Christmas tree. The great thing about looking at a very homemade Christmas decorated tree is that floods of memories and good times come back when you look at it every year. So for this post I'll be showing you how to make your own group of choir singers from soda pop cans. The other cool thing about this particular ornament is you can make each individual choir member look like each member of the family. I didn't think of that until after I made these so they don't really look like anyone I know-they're just and interesting group of people!
I started with a 6 pack of sodas. The easy part-drink them. They must be empty. Then rinse them out.
Then, step on them sideways like this. (above) They work best if you can manage to get the bottom of the can to not be seen but I really can't give any tips on how to get them to turn out any specific way (as you can see...)
Then I painted them a solid color. If you want the choir to match that is fine. I went with Orange, black, green and brown. I painted the faces peachy color for skin.
Then using a sharpie I drew in facial expressions. I also colored hole that you drink out of pink (or red) to mimic the inside of the mouth.
Then I added hair (all brown yarn). You can use whatever color you choose for hair.
A last detail I added was choir books complete with a song and notes.
I planned to give these to some friends so I wrote 'Merry Christmas from our family to yours, Dec. 2011' on the outside of the choir book.
I also used green felt to cut out circles for their hands (they are wearing green mittens)
This is a fun project, I let my 3 yr old paint her own but the older kids get the more creative they get with their details. It would make a fun night of family time! I hope you enjoy. Happy Holidays!

11.15.2011

Baby shower gifts

I don't know if you've heard of Pinterest but when I heard about it my original thoughts were that it was another Facebook social network that I did not want to get involved in. (I currently face a Facebook addiction) However, I did take a look and was instantly hooked. A couple days into looking around on Pinterest I came across baby shower gift ideas. I love making baby shower gifts and this soon followed-


The first gift, Ice cream in a bowl is just little wash cloths. I tried to use a blanket but it gets too thick at the bottom. I wrapped them around one another and secured them in place with scotch tape.
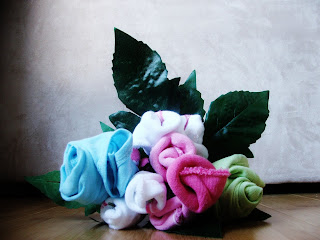
The flower bouquet was made with baby socks and onesies. The bottom of the bouquet is wrapped with a baby washcloth.

Thanks to Pinterest I'll probably be posting more baby shower gifts in the future, I hope you enjoy making these!

10.11.2011

Halloween jars, part II

This is the before picture for the Halloween jars....
And after

I'm not really sure what Frankenstein's monster says so I went wit GRR. The Frankenstein monster looks fun in the dark too!
With each color (orange for Jack-o-lantern, green for Frankenstein's monster, white for a ghost) just paint a light coat. I drew the black outlined faces first to give more light to come through around the face but in retrospect I would paint the green first then paint the faces after.
I also painted the jar ring black.
Next week I'll post pictures of the ghost jar!

10.04.2011

Halloween jars

I have many jars in the back of one of my cupboards that are gathering dust and I have been wanting to make use of them. Well a couple weeks ago I came across a craft store that had an idea similar to this and I thought I'd give it a try. I was really happy with how it came out. I painted a light coat of orange and then painted the typical jack-o-lantern face. On the back I painted 'BOO!'. I also painted the lid black. Any jar will work. It gives a fun glow to the house at night and I plan to line front step and my back porch with these jars come Halloween night!

Next week I plan on painting out a green Frankenstein monster to see how well that will work out!

9.20.2011

Gourdy Faces

Hooray it is fall! Probably the best time of the year because it is the beginning of all the great stuff: leaves changing colors, oranges and reds, candles burning, fireplaces lit, Halloween, Thanksgiving, Christmas, and family.

Of course I can't neglect the part where we buy pumpkins and gourds and put them all over the house, and this year I decided to add a little to the gourds. It is fun for your desk at work, or just to have around the house. I hope that it is cold enough today that I need to make some hot cocoa tonight with some fresh ground cinnamon. Yep it is.


9.13.2011

Table centerpiece

For this project you will need a 4x6 picture frame, a coordinating color of paper to fill the frame, a candle globe, a candle, and any color or shape of rocks (I chose black river rocks and small white chips.)
It is very simple, I just replaced the picture frame with the color of paper, in this case I went with red. After that I placed the candle globe on the frame and then spread the river rocks around the globe. Finally I placed the candle inside the globe. As an after thought I put large pieces of cloves inside the globe to give it a fall smell when the candle is lit. In the future I would have also chosen larger candles, maybe a votive red. The neat thing about this centerpiece is it is very interchangeable with the seasons. The paper in the frame can be a darker color to coordinate with the coming fall or even a festive orange or a pastel for spring. The rocks can also be changed out for another kind giving you another look also. I struggle with commitment so this works very well for me!! I also chose to go with three and arrange them together. They aren't glued together so they can be placed alone in a room or together. I really liked how it can be changed around when I am feeling the need for something new.


7.26.2011

Games with the kids

I do wish I had a more sophisticated project to present today but for now this will have to do until I can get to the antique store for something more fascinating!

But until then-this is a project I came up with my oldest daughter to help entertain us one afternoon. We received something in the mail in this narrow long box which is perfect to use for this project. A wider box would also work though.
Then we cut different shaped holes in the box.

And now we can throw little bean bags in it for a bean bag toss. Surprisingly this game was pretty fun for the kids and the box can certainly be dressed up and painted. The kids love painting so if they can participate it is more fun.

With the excess we built these little cardboard books and the kids loved these as well. They made their own stories in them.


Again, apologies for the lack of sophistication but if you ever find yourself bored at home with the kids and need a fun craft with the kids this worked wonders for us!


6.21.2011

Healthy Living

I have long been absent from posting and although I know listing a bunch of excuses is not really sufficient, here are the main two:


I relocated 2,000 miles away to lovely Virginia and I had my third child! It is always a struggle to stay motivated and on top of life when I am pregnant but having a third child completely threw me for a loop! And then when we moved far away I continued to fall behind in all my crafting! But with the re-introduction of the new face of our blog I found a chance for me to turn a new leaf and begin posting again.
Today I wanted to focus on something that I am also returning to. Exercise. Growing up I wasn't a very active person but since my husband has joined the military it has become a necessary thing in our family. (Also the fact that I have a pool at my new apartment-if we're going to be swimming 3 days a week I better get into shape!)
I'm gonna skip all the Why and head straight into the How.
I've got three kids and my baby hasn't left my side since he was born. This makes it quite difficult to work out. I can't go to the gym because I also happen to be without a car. I'm not trying to garner sympathy here, I'm saying anyone can exercise. Not matter how much is stacked against you. I work out at 10 am. I'd love to be a chipper woman who could get up at 5 but lets just say we're not there yet. I'd like to work out for an hour a day and also go for a jog but that is also a slim possibility. But right now, today, I can do something. Currently I am following a work out video. If you like to go that route I would highly recommend P90X or anything Jillian Michaels. I have seen great results from P90X but I've also heard great things about Jillian Michaels work out videos.
For those of you that don't like work out videos there is always something you can do. Start by warming your body up. I don't recommend exercising without a good 5 minute warm up as you are more prone to injury. You can warm up but marching in place, alternating every couple minutes with jumping jacks (30 seconds) and lunges across the room. Keep in mind that your warm up should include pumping blood to the specific areas of the body that you plan to work out. If you are planning on a cardio workout concentrate on stretching the lower body and getting good blood flow to the legs. After a warm up begin a work out. Even if you only work out 10 minutes a day, it is better than nothing. Start with push-ups, sit-ups, (or crunches), and then lunges. Use any three variation of workouts and then repeat. Pick another three variations of workouts and repeat. If you have weights incorporate a bicep work out into the routine. End with a cool down session where you stretch the worked out muscles.
I personally prefer a dvd that plans a work out for me but if you're the kind of person who wants to put together their own workout then that is awesome!
Regardless of your choice you can get a good workout. Exercise can help you have more energy and can help you feel better about yourself physically, mentally, and spiritually. If you're not an active person don't let that stop you. Start small by going for a walk around the neighborhood or riding your bike. Park your car at the back of the parking lot when you go shopping. Make little choices that make you work harder physically. I promise it'll bring you more energy and happiness!
Next record your progress. Take a before shot of yourself. Get a tape measure and take note of your legs, arms and stomach. Don't get hung up on what the scale says. Concentrate on loss in inches. Keep in mind that starting small it will take longer to look in shape but you will feel better about yourself if you are continually working out during the week.
Lastly try to make small changes in your diet. Don't start a diet, just make healthier choices. Get the wheat bread instead of white. Cut back on the pasta. Increase the greens in your diet. Cut back on sugar. If you start making small choices and feel better it will motivate you to make bigger changes as you progress.

It is a lot to take in but I'm a firm believer in taking care of my body. If we are physically healthy it makes for a healthy mind and heart. I feel like I'm more use to my family and the world if I make sure I'm healthy. I am also prone to depression and this helps me maintain a happy attitude on life. I hope you'll make an effort to live healthy! If you already are doing good remember to take it easy on yourself!

11.02.2010

Treasure Island

I recently joined a bunco group and being the "new girl" earned me the right the throw the first themed bunco party this month. I have chosen the theme of Treasure Island! It has been a lot of fun putting together gift ideas and I thought I'd post what I came up with.

The prizes are arranged in order the first 4 being more expensive and then the last
8 of the same value. The more expensive gifts are treasure chests filled with jewelry and chocolate...a bunch loot for girls! So I went to Hobby Lobby in search of treasure chests and found 3 wooden unpainted boxes and varnished them a dark cherry wood. After the varnished dried (2-3 days) I sanded the edges to try and give a aged look. It didn't work very well but I like finished look. I then lined the interior of the boxes with satin fabric and filled it with loot. (chocolate gold coins give a nice finishing touch!)

10.05.2010

Creative writing

Today I don't have any pictures, crafts, or anything visual to share but I think it is important to mention creative writing when considering creativity. One of the greatest pleasures I have in life is reading and writing. When I am able to bring a story to life on paper it really is one of the greatest feelings in the world. I am not a great or accomplished writer but I do believe that the first step to becoming great at anything is studying. People go to school and learn about anatomy and biology and great number of other things to become experts on the body (doctors) and in order to be a great writer research is key! This is actually the greatest research too, because it requires reading the books you love to read. I aspire to write children's books so I read children's books every chance I get.
Recently my sister gave me a great idea to help aspiring writers get their ideas down on paper. Start with writing out short summaries of scenes until you reach the end of your story. This method is great because it helps you find the direction you want to take with your book and in a general sense so that you can later return with detail. My most recent story has about 52 scenes and I could have made more! Next write out all the characters, their names, and a short description. This is a good beginning for anybody who is interested in writing a short (or long!) story.
I would also like to point everyone to a blog by my brother-in-law who is a writer. If you leave a comment about a character, event, and place he will write a short story! Check it out.

9.21.2010

Kid Crafty

I have been bugging my daughter (I think this is what term she would use because she seems annoyed that I keep asking) what she wants to be for Halloween. I told her no on the pirate because that was what she was last year so we have settled on princess. While we were browsing hobby lobby yesterday we saw these little masks and feathers and I thought it would be cute to make a pink mask to go with her princess dress! I think I like how it turned out and it was very simple to make. We smothered it with elmers glue, sprinkled glitter over it and then glued feathers on. This is a fun project that can get pretty creative with all t
he decorative feathers out there. I can't wait to make my mask!
Just a side note...they do have children's masks that will fit their faces better than this adult size mask! (And only 2.00$ at hobby lobby)

7.20.2010

Diaper Cake

I saw this idea at a baby shower many years ago and have added my own twist on making my own diaper cake. These can be very elaborate or very simple. This diaper cake was made for a little boy, I find that it is easier to go all out on trinkets and additions with girls.

First I take one diaper (size 1 or newborn) and I roll it up and tape it (scotch tape is easiest). One bag of 50 diapers is sufficient for a whole cake.
Next I take another diaper and wrap it around the first diaper and tape it. I continue to roll diapers and tape them to the previous diaper until I have the roll size I like. The bottom layer I use about 25 diapers, the middle 18, and for the top I use 7. I've tried more even numbers but this seems to be the best combination. (I am a little obsessive compulsive about the numbers being 25, 15, and 10 but it just doesn't work as well). After I have rolled all my cakes I take 3 different materials that I've purchased at the store (Joannes and walmart sell small quilt squares for about 1.00(Wal-mart)-3.00(Joannes)$. Joannes has a greater selection. I take the top layer first and wrap the material over the diapers and pin it at the bottom with my finger and then glue with a hot glue gun. It is a bit tricky and I've burned myself every time I've made a cake. I pull the material several times and glue it until I get it looking the way I desire.
For a final touch on the layer I put a fat ribbon around it. (Usually this color coordinates with my fabric)
Continue this step with the other two layers. After the cake is complete I stack it just the way I like it and add extra fun stuff for the baby. (Additions for the mother are also a good idea.)

The last cake I made was for a little girl and I included a play cell phone and play jewelery-very fun!

After everything is added I take cellophane and wrap the cake and tie it with the same ribbon I used to tie around each cake layer.