Showing posts with label sewing. Show all posts

2.17.2012

Organizing Our Home: Mini Fabric Bolts & Mini-Mini Bolts

I have to confess. I have A LOT of fabric. My husband might say that I have TOO MUCH fabric, but we can discuss that another day. The biggest problem with my fabric is that all the pieces are different. Some are just left overs from another project, some are fat quarters, and some are a few yards, just waiting to be cut and sewn. It seemed that no matter how I folded and piled, it never looked or was organized. I often knew (or thought I knew) that I had a certain piece of fabric, but then I couldn't find it. Or I would tear everything apart looking for it and end up frustrated and with a bigger mess.

I have seen a number of different ideas for making mini bolts, but I had a hard time finding the materials recommended or didn't want to spend that much money.

What you need:
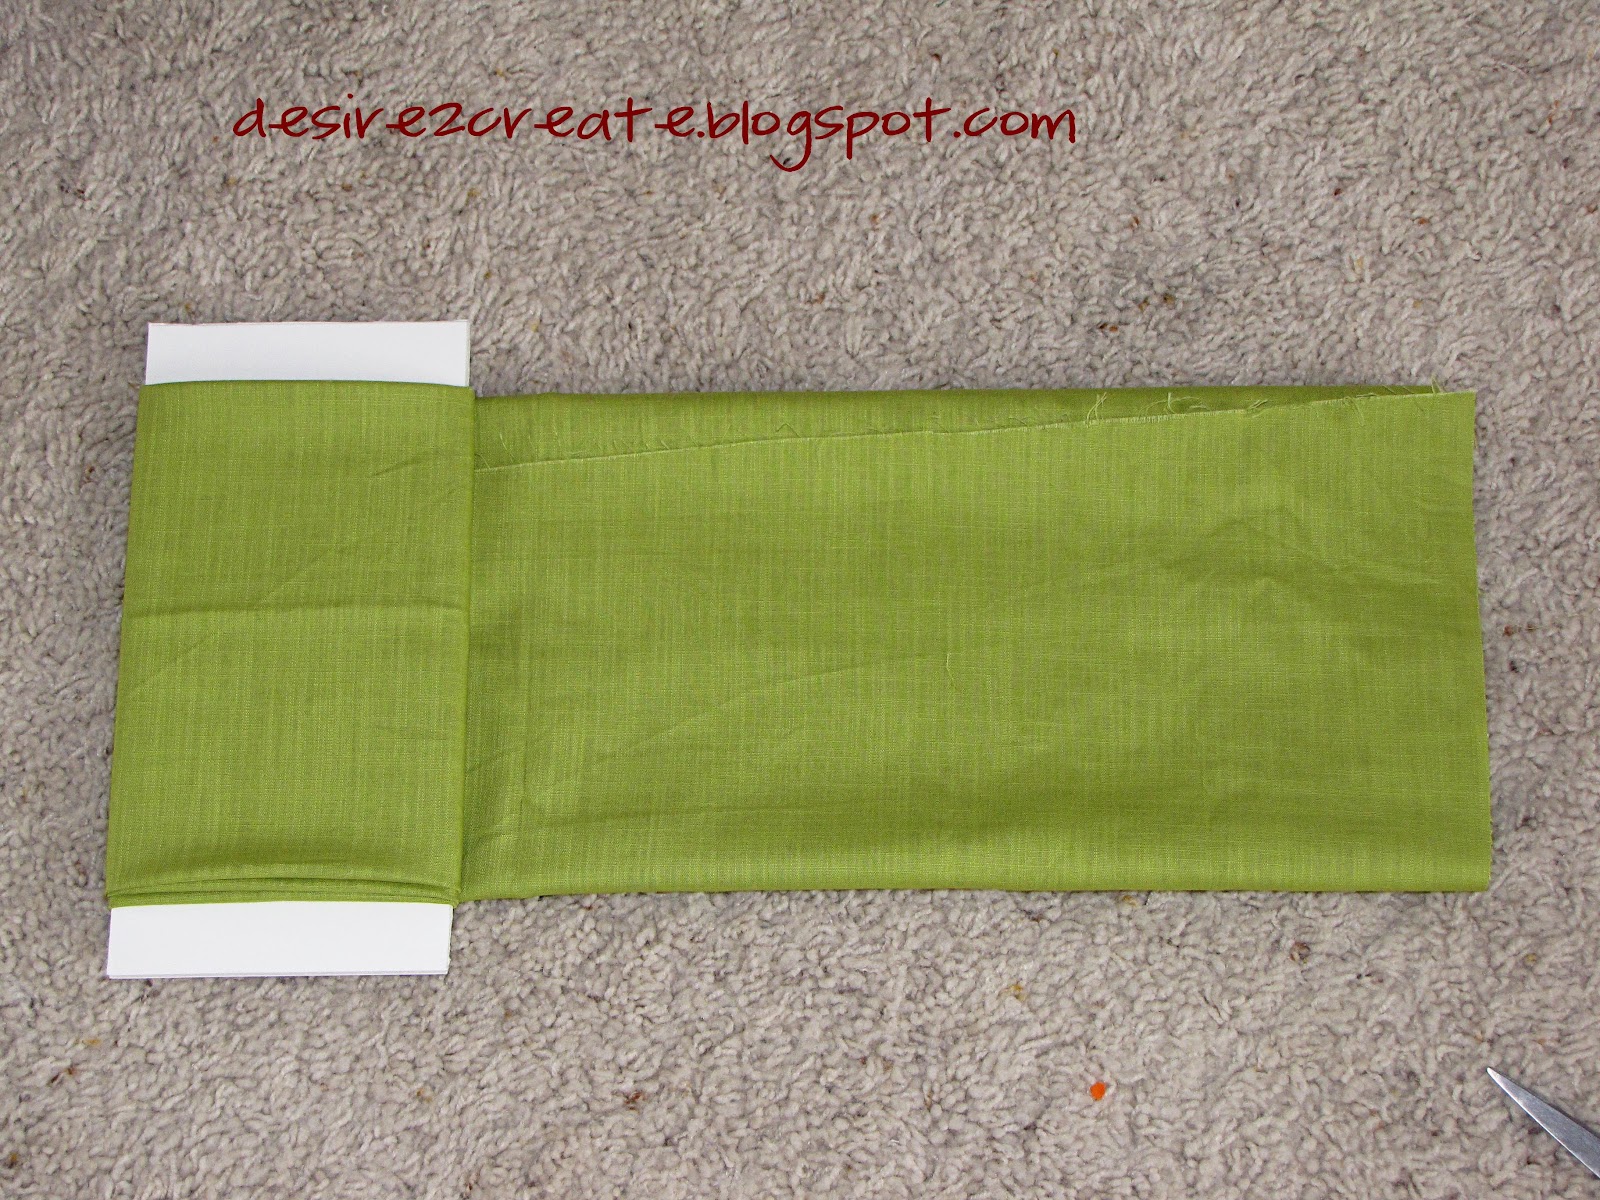
20 x 30 Foam Core Board (I found mine at Walmart for under $2 a board)
Jumbo Paper Clips (found at Walmart in the Office Supply section)
Ruler/Yard Stick & Pencil
Sharp Knife

I first measured and drew out the cutting lines. The Mini Bolts measured 10 inches x 5 inches. I drew out all the lines I needed to cut on and then cut along the lines with sharp knife. Then I took a piece of fine sandpaper and gentle smoothed out the rough spots and edges.

Then I took my fabric, layed it out flat, folded the raw edges to the center, and began wrapping it around one board. When I got the end of the fabric I folded the edges under and secured them to the other layers of fabric using the jumbo paper clips.


For the Mini-Mini Bolts: Draw lines that are 6 inches x 4 inches. And follow that same instructions for cutting and folding.

I found that I could fit up to about 2 yards of neatly folded cotton on a Mini Bolt and the Mini-Mini Bolts were perfect for fat quarters, 1/4-1/2 yard cuts, and smaller left over pieces.

I love how I can easily see and grab what pieces I need and how neat and tidy it makes my shelves look. And how inexpensive it turned out to be. Hope this gives you an idea of organizing your creative space, have a great weekend!

8.19.2011

T-shirt Makeover….

IMG_0113I found this T-shirt at K-mart for 50 cents, I loved the color, but it was too big, but I thought I could do something with it. This is what I came up with.IMG_0099
The first thing I did was fold it in half and press with the iron, then I unfolded it and cut the front along that line. IMG_0100IMG_0102
Then I took fabric from a jelly roll that I had on hand, measured the length of the cut front + seam allowance and cut 4 pieces that length. With right sides together, sew two together the long way, and then the other two together the long way and press open.
Press over a little bit (I did about a 1/2 inch) toward the wrong side of these then fold wrong sides together and press the long way. This helps everything lay better in the next steps.
I wanted to have another little accent piece so I measured another length of fabric, then pressed it in half to make the orange stripe.
IMG_0103IMG_0105
Now you make a sandwich using all the pieces. First, the first the large accent piece, then the edge of the shirt you cut, then the small accent piece, and finally the other half of the large accent piece. Then pin everything together and sew along the edge of the large accent piece. I sewed 2 lines because I like how that looks, but you can do whatever you would like.
Then repeat with the other half of your shirt.
IMG_0106IMG_0108
I wanted buttons the entire way down, it is just a preference. You could do 2 buttons like a cardigan or use snaps or just leave it open if you want, but I really REALLY like using my button hole foot on my sewing machine and I like sewing on buttons on my machine, it is so fast and fun. (I need to get our more, I know.)
IMG_0109IMG_0112
I measured where I wanted button holes, then used my sewing machine to sew them.
Then I marked and sewed on my buttons, trimmed the threads and all done. I like how it turned out, it fits nicely now that I took a little out and the button flaps overlap. Keep an eye out for clearance shirts…. I bet this could be used on a sweater too…. I let you know if I try it, have a great day!
IMG_0116


2.23.2011

Yoga Mat Bag

Well I am finally jumping back into the blogging world after having a baby! I am now back tracking to post all the Christmas gifts I made last year. This yoga mat bag was for my brother-in-law.


The tutorial for this bag is by Laurie Wisburn. Go HERE for her instructions. I didn't follow her instructions exactly, but close enough to get some good ideas. For the inside material, bottom, and handle, I used ripstop fabric. That made it really durable. I also used something similar to a shoelace for the tie. Trying to make a tie out of fabric was a pain. (click on the picture for a closer look) My main pieces of fabric were longer and wider than the 17in.X27in. that she recommended. Mine was probably more like 20inX30in. I wanted plenty of wiggle room.

My brother-in-law loved it and to prove it's manly enough, I made my handsome husband model for me. :) Thanks Ben!

1.07.2011

Reusable Shopping Bags....

I think most of you can tell that I LOVE TO SAVE MONEY! (who doesn't?) I also really LOVE recycling, upcycling, and using things I already have. This tutorial does both. Did you know that some stores will take money off your order when you use your own shopping bags? Some stores will take 5 cents off per bag or offer other rewards (like Smith's offers points that turn into money quarterly).

I'm sure you all have a huge stash of grocery bags under your kitchen sink or stuffed in your laundry room, right? Well, this tutorial will use A LOT of them!

MATERIALS:

A LOT of plastic grocery bags.
Parchment Paper
Iron
Sewing Machine and Thread
Scissors

FUSING GROCERY BAGS:
Preheat Iron. My first tip is start with a LOW heat on your iron, like the SILK setting. If your iron is TOO HOT it will melt the bags into a crazy lump.

Take your plastic grocery bags and cut off the bottom of the bag and the handles. This will give you a plastic loop, now slide your scissors up one side and make a large rectanlge. If you really wanted to be precise you could cut each bag the exact same so that the print match up exactly, I don't really care that much.

Once you have 8 bags cut into large rectangles, sandwich them between two sheets of parchment paper. Place on your ironing board and begin to iron. ALWAYS KEEP YOUR IRON MOVING! or the sheets will melt. and make sure to get the edges. Once the bags begin to fuse it goes rather quickly. Once you notice that bags fusing (not melting), flip the whole thing over and iron the other side.

Remember it is HOT, so let it cool before you handle it too much. Once it is all fused you can sew it on your sewing machine and make your own reusuable shopping bags. I like to straight stitch and then zig-zag stitch my seams so that they can handle some abuse.


This first one I made I patterned after another fabric shopping bad I already had. I am working on a couple of other designs and when I get them finished I will post them. I hope you enjoy trying this out!


12.30.2010

Grocery Bag Holder

As I was struggling to come up with ideas for homemade Christmas gifts, I stumbled across a tutorial for a grocery bag holder and thought of my mother-in-law. She has an abundance of grocery bags and no place to store them so I decided to make her one for Christmas. This idea comes from one of my favorite crafty blogs Make It and Love It. For the grocery bag tutorial and instructions... Go HERE.


This project was so simple and cute that I decided to make two more as gifts for other people. Originally I planned on saving all my grocery bags and stuffing them full so that the recipients would already have a bunch of bags for it.... but, I forgot. I now have hundreds of grocery bags piled in my garage and I gave out all my grocery bag holders. Hmmm, I guess I will be making another for myself very soon.

12.09.2010

Kid's Apron

This year for Christmas, I decided to make all my gifts. I am not quite sure what I was smoking when that thought came into my head. :) But I went and bought all the material and supplies right after that moment of craziness and so I was kind of stuck with my idea.

One of the biggest projects Ben and I took on was a play kitchen for our kids... post forthcoming! To go with that gift, I made these easy and adorable reversible aprons. Don't you just love that fabric too?! It came from JoAnn Fabrics.


I was going to post directions and more pictures but my photographer, ie husband, was too busy studying for finals. So... you will just have to use the tutorial that I found. It was a great set of directions though and I probably would have just confused everyone.

The tutorial is by Joanna Armour at Stardust Shoes. Go HERE for the instructions. She also has a super cute tutorial for a chef's hat. Go HERE for that. I may just have to try that one out too.

11.29.2010

Diaper Holder


Well since I have a few friends and family members that are expecting babies, I wanted to make them something cute that they could use. These diaper holders are great for quickly grabbing diaper and wipes all in one.I found the idea here.

What you will need:
Sewing machine
Thread
Fabric

Fabric you will need:
Sixteen 4X4 squares
Two 5 wide X 8 long (you will fold this piece in half, long ways)
Eight 4X4 squares of flannel to add thickness and color
Two 2 1/2 wide X 8 long of flannel to add into the top pieces

(I bought 2 fat quarters of the pink and orange, 1/3 yard of the green, 1/3 yard flannel, and 3/8 yard of the brown and I made almost 3 holders)


Layer each of the squares for sewing. The bottom will be the inside of the holder, lay face down. Then add flannel and the top piece. For top piece lay flannel in between the fold.

The Lil' Luna blog has a good example of how things are supposed to be sewn together.

After you have your squares laid out in the order you want them sewn them together, take the bottom 2 squares and sew them together with 1/2 inch seam allowance. You want the seam to be on the outside. Then match the top 2 squares together and do the same thing, be sure to keep the seams open. The top strip will then be attached to the top blocks.


Repeat these for side 2.

Sew the 2 sides together with 1/2 inch seam allowance, leaving the seams open.


Clip the seams about 1/2 inch apart. Once you wash it, the ends will start to fray and it will look like a rag quilt.


The case can hold 4-6 diapers or 2 diapers with a wipey case.

11.10.2010

Dinosaur Cape Tutorial & Giveaway!

I came up with this cape for Halloween for my boys, it is light-weight so it is easy to move in and simple to make. Here’s how...


Here’s what you need:

(1) Fat Quarter or 18 inch x 22 inch piece of fabric

(1) 9x12 inch piece of felt
(1) 37 inch Bias Tape (this will be the top of your cape and the tie, so you can measure your little one and decide what length you will need)

Coordinating Thread

1. Cut out your dinosaur spikes out of the felt. I used spikes because that is what my boys wanted, but you could also use smooth bumps like ½ circles or really spikey spikes. For this one I made a paper template that was 3 ¼ inch x 3 ¼ inch x 3 ¼ inch. I needed about 6 spikes of this size to go all the way down the back of the cape. Set them aside.

2. Now we move to the ironing board. On the 22 inch side of your fabric, fold toward the wrong side about ½ inch of fabric and iron, then fold and iron it over again. This hides the raw edge and keeps it from unraveling. Do this to the other side as well. (As a side note I am totally embarrassed by my ironing board! I will be making a new ironing board cover very shortly)

3. Now take your fabric and fold it in half RIGHT SIDES TOGETHER lining up those nice edges you just made and iron.


 4. On the sewing machine, stitch down the 22 inch sides that we ironed.
5. (This step is optional so if you don’t want to you really don’t have to.) You can take each of your spikes and top stitch.

 6. Align your spikes in the crease we made when we ironed the fabric in half and gently fold the fabric back over. Carefully pin each spike. Stitch down this folded seam with a ½ inch seam allowance. Then Stitch again with a ¼ inch seam allowance to reinforce the seam.


 7. Now roll the bottom edge toward the WRONG SIDE ¼ inch and then roll again and iron. Now Stitch this edge.
8. Sew a gathering stitch along the top edge of the cape. Gentle pull thread to gather the top of the cape until it measures about 9 ½ inches.
 9. Find the middle of your bias tape and line that up with the spikes of the cape. Carefully pin bias tape along the top edge of the cape, hiding the raw edge inside the bias tape.
10. Stitch along the edge of the bias tape.


11. And you are all done! I hope you have as much fun pretending with your little ones as I have had with mine.


Wouldn’t this make a fun Christmas or Birthday Gift? Well, you could WIN one! That’s right I’m going to be GIVING AWAY one Dinosaur Cape.

Just leave a comment (with your email) to enter. Want another entry? Become a Follower and leave another comment. Good Luck! Giveaway ends Tuesday November 16, 2010.

5.26.2010

Baby Bibs


I started these bibs two and a half years ago, when my oldest was just starting solid foods. I'll just sum it up by saying they sat in the closet for a long time. I finished them up yesterday. These are the kind of bibs we had for my sister growing up. They work for little babies clear on up through toddlers. And the cover everything, not just the shirt collar.

I simply took kitchen and bath towels. Cut a circle in around where the neck should go (I used a bowl to cut an even circle). Lined it all with bias tape, made button holes, and sewed on buttons.
I made a lot...but it did take me nearly 3 years.
My cute models.

And speaking of sewing, here is a shout out to my friend. I won this cute apron on one of her give-aways. She is always doing fun crafty things to improve her home. Go visit her blog. Thanks Abbey!

5.18.2010

Felt fruit

Something that I've recently become very interested in is felt fruit. All you need to do to explore the world of felt fruit is simply google the phrase and you'll likely become as obsessed as I am! I decided to try making my own, although if you would like to make one from a pattern there are many sites that sell patterns to make the fruit. This is the first time I have attempted to make felt fruit but I plan to post more in the future!
I decided to try a tomato this time around.
First I cut a square (round is actually recommended) of red felt,
then I gathered cotton to stuff the tomato, and then I threaded red thread.

After all this I took the red thread and tied a knot at the end and then stiched in and out around the edge of the fabric. Halfway through i realized it would be better for the felt to be round rather than square so I adjusted the shape by cutting off the corners.

After I sticked the tomato I pulled the string tight and stuffed it with cotton so it would hold it's shape while I finished stitching.
After I stuffed the tomato I tied off the stitch to hold the tomato in place. Then I pulled out a square of green felt. I cut stem with three legs to look like leaves coming off the tomato. The stem I used green thread and stitched around the stem to tighten it into place so that it would stand up straight and look more like a stem. Lastly I stiched the stem on to the tomato. Not my best work but hopefully I'll get better as I attempt other fruits and veggies! (perhaps even some dessert!)

This may not be enough to get you excited about felt fruit but take the time to google it and look at the images the result in the search! It is fun and i'm excited to make an assortment of fruit for my children!