12.21.2011

Save those Christmas Cards

And recycle them into a Christmas ABC book!
When we were expecting our first daughter, my husband's mom gave us an ABC book that she made out of Christmas cards. She had made one for each of her children when they were young and was passing down my husband's to us. I decided then I wanted to make one for my nephew. I started collecting our Christmas cards. And my parents'. And my husband's parents'.


Five years later, I had enough cards.  I'm telling you...it took forever because so many people send out family picture cards or Christmas emails.  So now it is no longer just my nephew in that family, but 2 nephews and a brand new niece.  I do have some left over cards, but you need a ton to be able to choose for each letter and then the number.
My husband's mom made hers in 1" binders with page protectors and red and green paper.  I made mine in an 8x8 scrapbook with page protectors (had to buy 2 refill packs to add to it) and Christmas scrapbook paper.  Both are super easy.  Hers has more room on a page and is cheaper by far.

The one I made for my nephews and niece

The one made for my husband

Here are some hints I used/realized:
  • Group similar cards (i.e. angels, snowmen, etc.)
  • Leave letters that have multiple words (S is for Shepards, Star, Snowman, Snow, Snowflake, etc) for last
  • Use a business card template for the wording, I only had to cut a few smaller
  • Wish I would have used less patterned paper for the backgrounds, some are too busy to read
  • Let glue dry for a at least 45 minutes to ensure it doesn't make the page protectors go wavy.  (You can see it in mine on pages "X" & "Y")
  • I had to go to the dollar store and pick up a few cards for letters I didn't have, like "Y" (yule log).
The kids loved these books and gazing at each picture.  It does take some effort in collecting and sorting out each letter, but it is pretty simple after that, just cutting and gluing.

Here is the Christmas ABC document I created to help me sort out cards.  It is just what I gathered from here and there so it is rough.  There are repeats, some very closely worded, and some without rhymes.  You can really do whatever you can come up with.  The ones in bold are the ones I ended up using with the cards I had.

Start collecting those Christmas cards now (ask family and neighbors for the fronts of theirs too), or your kids might be graduating from high school by the time you get enough.

Heads up: Also you may be able to score cheap some cards the day after Christmas at the store.  And  I saw a Christmas card at Wal-mart that had children holding hands around a world - perfect for letter "U".  Don't know how much it was though.  Some cards are way too expensive.

12.09.2011

Boredom Buster

***Be sure to check out Keri's Guest Post at Darling Doodles***

It has been really cold at our house, which means that our 2 (very active!) boys have been stuck inside and we are all driving each other a little crazy. This is actually something that my grandma would let us do when we went to her house and we always loved it. 

All you need is a rimmed baking sheet, pint mason jar, a straw, dish soap and water. 
Fill the mason jar about half way with water (I used warm water because it is softened and makes TONS of bubbles) then add a generous amount of liquid dish soap. Place the mason jar in the middle of the rimmed baking sheet and start blowing with the straw. Make sure and remind them to BLOW not suck. My 2 year old did a great job and I think he only tasted bubbles once before he realized that it was for play not eating.

 The bubbles will spill over the side and they can see how tall they can get them to be or who can make the biggest bubbles. The bubbles on the baking sheet will eventually pop and then you can carefully dump the soapy water back into the jar and do it again.


Guest post!

Hey everybody, check out my guest post today at Darling Doodles!

12.02.2011

Christmas Wreath...

I love decorating for Christmas, it is my favorite holiday, and I like to do a few new things every year. This week I worked on this wreath to put above our fireplace. It was really simple and worked up pretty fast.

Here's what you need:
Hot Glue Gun and Glue
Cardstock or Cardboard for wreath base
Scrapbook paper (I used 4 sheets of double sided Christmas paper)
Large Circle Punch (or scissors and patience)

The first thing I did was make my base. I had originally dreamed this wreath would be made on a foam wreath form. Unfortunately, the store I usually get them from doesn't carry them anymore and the next closest store is and 1 1/2 hours away. So I improvised. I used a piece of heavy brown cardstock. I used a large dinner plate to trace the first line and then a bowl for the center line. Then I just cut it out with my scissors.
 Next you need to make the 'leaves'. I used a large (3 inch-ish) cirlce punch. You could free hand cut them if you are patient enough or use a craft cutter. The punch worked great for me. I cut a large circle first.


Then slide the circle back into the punch, but only part way to make the leave shape. I could get 3 large leaves out of each circle or 4 smaller ones.


To give the leaves shape, just pinch one end of the leaf. Then start gluing leaves around the outside of the wreath edge.
 This is how the first layer looks around the outside edge.
 The second layer I flipped the leaves the other way and glued them in bunches of 2 leaves and then 3 leaves. Layer 4 was the same direction as Layer 1, but I put the leaves on an angle overlapping the the previous one. And the last Layer, over lapped the previous leaf and then I folded just a little bit under and glued towards the back of the wreath.


And here is the finished wreath!. I hung it with a thin gold wire to the front of an antique cupboard door and then set it on our mantel. I hope you all have a fun time decorating and creating for Christmas!

11.29.2011

Christmas Ornaments

Growing up with 8 siblings required our family to be a little creative when it came to finances. One thing my mother did was make our Christmas ornaments. I really enjoy having a very beautifully decorated tree (that matches) and looks gorgeous but sometimes it is fun to have a very personalized Christmas tree. The great thing about looking at a very homemade Christmas decorated tree is that floods of memories and good times come back when you look at it every year. So for this post I'll be showing you how to make your own group of choir singers from soda pop cans. The other cool thing about this particular ornament is you can make each individual choir member look like each member of the family. I didn't think of that until after I made these so they don't really look like anyone I know-they're just and interesting group of people!
I started with a 6 pack of sodas. The easy part-drink them. They must be empty. Then rinse them out.
Then, step on them sideways like this. (above) They work best if you can manage to get the bottom of the can to not be seen but I really can't give any tips on how to get them to turn out any specific way (as you can see...)
Then I painted them a solid color. If you want the choir to match that is fine. I went with Orange, black, green and brown. I painted the faces peachy color for skin.
Then using a sharpie I drew in facial expressions. I also colored hole that you drink out of pink (or red) to mimic the inside of the mouth.
Then I added hair (all brown yarn). You can use whatever color you choose for hair.
A last detail I added was choir books complete with a song and notes.
I planned to give these to some friends so I wrote 'Merry Christmas from our family to yours, Dec. 2011' on the outside of the choir book.
I also used green felt to cut out circles for their hands (they are wearing green mittens)
This is a fun project, I let my 3 yr old paint her own but the older kids get the more creative they get with their details. It would make a fun night of family time! I hope you enjoy. Happy Holidays!

11.21.2011

Pumpkin Streusel Pie

Well I am gearing up to make pies for Thanksgiving this year. Over the weekend I practiced making a new crust and a new Pumpkin pie recipe. First, you must start with the crust. This is a delicious, no-trans-fat recipe that will melt in your mouth. I got the crust recipe from a friend at work--thanks Ruth. The pumpkin streusel I found at this website.


Crust:
2 2/3 cup flour
1 1/2 tsp salt
2/3 cup OLIVE OIL (regular, not light tasting or extra virgin)
4-5 TB ice cold water

In a large bowl, combine flour and salt. Stir to incorporate. Then add your oil and 4 TB water. Mix to incorporate. Try not to overmix or it will make your dough dry and less flaky once cooked. If your dough looks dry, add UP TO 1 TB more water. Once everything is mixed in, cut ball of dough in half. Roll out one half between 2 pieces of plastic wrap. Using the plastic wrap, flip crust into pie pan. If you need a pre-baked crust (such as for a cream pie), bake at 475 degrees for 12-15 minutes.

Pumpkin Streusel Pie
1 can (16 ounces) pumpkin, or 2 cups puree
1 can (14 ounces) sweetened condensed milk
2 eggs, beaten
2 teaspoons pumpkin pie spice
1/2 teaspoon salt

Heat oven to 400°. In a large mixing bowl, combine pumpkin, sweetened condensed milk, eggs, spices, and salt; blend well.


Pecan Streusel Topping
1/2 cup firmly packed light brown sugar
1/8 cup white sugar
1 tsp vanilla
1/2 cup flour
1/2 cup firm butter (I thought this was too much, my mixture never got crumbly so I would suggest starting with 1/3 c butter)
1/4 cup chopped pecans
1/4 cup macadamia nuts chopped
1/2 cup coconut (sweetened flaked shredded)

Streusel topping: Combine brown and white sugars, vanilla, and flour; cut in the butter until crumbly. Stir in chopped pecans, macadamia nuts, and coconut. Set aside. (I used chopped walnuts and almonds and it was still yummy).

Pour pumpkin mixture into the unbaked pastry shell. Place a rack in the middle of your oven and one a step or two higher. You want the pie to fit on either rack because you are going to move it to the top rack at the end of baking.

Bake for 15 minutes on middle rack.

Reduce oven temperature to 350°. Bake for 25 minutes longer.

Next sprinkle streusel topping over pie. Move to higher rack and continue baking at 350° for about 15 to 20 minutes longer, or until golden brown and the filling is set.

I had several people who are not Pumpkin pie lovers tell me this pie was not too pumpkiny. They really enjoyed it. Delicious with ice cream or whipped cream. Enjoy!

11.18.2011

Organizing Our Home: The Linen Closet

The Linen Closet is really a multi-purpose closet at our house. The sheets live here, as well as tableclothes, my coupon file, candles, and our family games. (Sometimes extra toilet paper, as you can see). But on my quest to be more organized, I had to tackle this closet and to tell you the truth I usually just close it and walk away.

I will make a confession, I hate folding sheets! The fitted sheets never turn out the same size as the matching flat sheet and they never look nicely folded. And then when someone goes looking for something (or climbs the shelves to try and get to the games) and sheets come falling out or they get stuffed back onto the shelf! Ugh, I just hated this closet!

So here is the BEFORE picture. EEK! How embarrassing!
 And the AFTER! Much better. So here is what I did. I first got this idea from here, which I found via Pinterest and then I have tweeked it to my own needs. The blue baskets are from Dollar Tree, yes the dollar store! Our store had a couple other colors, but I like the blue/turquoise best.
 I actually rolled on the sheets and pillowcases so that they fit into the round baskets and looked nice and neat. 
The labels were made with white cardstock, a $1 stamp set from Walmart, $1 ink from Walmart, and Jute Twine that I actually got for another project for Christmas (I'll share it later, of course if it works). I didn't want my tags to be too perfect and so I just stamped and inked the edges, then tied them on.
 Here is a close up. And these are the supplies from Walmart. 

I hope this inspires you to tackle your linen closet too. What is your secret for keeping a linen closet organized?

11.15.2011

Baby shower gifts

I don't know if you've heard of Pinterest but when I heard about it my original thoughts were that it was another Facebook social network that I did not want to get involved in. (I currently face a Facebook addiction) However, I did take a look and was instantly hooked. A couple days into looking around on Pinterest I came across baby shower gift ideas. I love making baby shower gifts and this soon followed-


The first gift, Ice cream in a bowl is just little wash cloths. I tried to use a blanket but it gets too thick at the bottom. I wrapped them around one another and secured them in place with scotch tape.
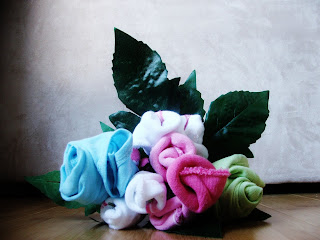
The flower bouquet was made with baby socks and onesies. The bottom of the bouquet is wrapped with a baby washcloth.

Thanks to Pinterest I'll probably be posting more baby shower gifts in the future, I hope you enjoy making these!

10.28.2011

Organizing Our Home: The Mail/Filing Center

I hate mail clutter, it drives me crazy and yet it is always there! But I am determined to stop it and here is our solution. A small 'Mail Center'. Our home is a split entry, so you open the front door and you are on a small (really small) landing and you can either go upstairs or downstairs. There really isn't any room for anything right there, so I had to move my solution to either the kitchen at the top of the stairs or the living room. The kitchen has been the drop zone for everything and it drives me crazy, so I am trying the living room, on top of the blue dresser I painted. 

I simply found a small filing box at Walmart, hanging folders and manila file folders. Labeled them and stuck them in. Unfortunately, the green of the hanging folders is really ugly and this is my living room, so I grabbed a piece of my favorite scrapbook paper and made a little slip-cover for the first file. I didn't even have to cut the paper, because the file was exactly 12 inches across and I just folded it to match the length. I can swap it out anytime I want a change, but it is much cuter than the army-greenish hanging folder.

The basket next to the file I have had for a long time and it has floated around the house trying to find a home.  It is divided into sections and works perfectly for holding some supplies needed at a Mail Center/Living Room. I put my can of febreeze spray in one spot, the address book, thank you cards and envelopes, sticky notes, 3x5 cards and my piano lesson calendar. This is also where I keep our bill paying envelope. 

It is simply a zipper pouch, I found this one on clearance for 10 cents at Walmart. Inside is everything I need to pay bills; check books, stamps, pens, and the chart where I keep track of our expenses and paid bills. It is so nice to slip the bills into the TO BE PAID folder and then on Friday, grab the folder and this pocket and I am all set... no searching for the check book or rummaging for a pen that works.

Now, you probably noticed that I DO NOT keep pens in the little basket out in the open. This is why.... He is 2 and likes to write "lists" and his "name" on everything, including his face, the walls, the couch, the windows, the tablecloth.... Hope you have a wonderful and safe weekend!

10.22.2011

Eye Ball Frame

I had another organization post planned for this week, but I got the flu and have been SO sick. I'm finally feeling better, so here is quick Halloween Frame.


I used:   a wooden from from Walmart
                 craft paint
              lots of plastic eye balls (I got the variety pack, but you could use all the same size)
                hot glue and gun
1. Paint Frame
2. Start gluing on eyeballs.
           I started on the inside and then worked my out. I just wanted to have as many eyes as I could get on it.
3. Slip a favorite Halloween photo inside or anything Halloween sign.

10.17.2011

Halloween Party Ideas

If you're looking for some party ideas for Halloween, you might find some new ideas here! We had a party last week for our kids and it was a huge success. This is what we served for food... My neighbor made the cookies, strawberries, and pudding. I made the sandwiches, juice boxes, veggie tray, and favors.


 Sandwich idea from Pure Joy Events.  There are tons of ideas on that blog!

 Juice boxes wrapped in white electrical tape. Idea from Parents.com


Pumpkin bowling was a huge hit! Idea from Be Different, Act Normal.

My neighbor made this totally awesome bat pinata! The kids had a ton of fun with that. She said it wasn't too difficult either. Instructions are at Martha Stewart. Also at Martha Stewart was a craft that we did... Check that out HERE. There are lots of great ideas there.

I forgot to take a picture of our ADORABLE favors, but here they are with a FREE printable. CLICK HERE.

Our easy and cute invitations were also FREE using a printable! CLICK HERE to see those.

HAPPY HALLOWEEN!

10.11.2011

Halloween jars, part II

This is the before picture for the Halloween jars....
And after

I'm not really sure what Frankenstein's monster says so I went wit GRR. The Frankenstein monster looks fun in the dark too!
With each color (orange for Jack-o-lantern, green for Frankenstein's monster, white for a ghost) just paint a light coat. I drew the black outlined faces first to give more light to come through around the face but in retrospect I would paint the green first then paint the faces after.
I also painted the jar ring black.
Next week I'll post pictures of the ghost jar!