
Showing posts with label organization. Show all posts

3.30.2012

The Sock Sack...

As our family has grown so has the abundance of lost socks. It drives me crazy to have all the laundry done and find I still have a basket of socks without their match. Likewise, it drives me crazy to find a dozen socks under my boys bed, behind the couch, in the sandbox, or in the bottom of my pantry! When have dirty socks ever gone in the pantry?! 

So, here is my new solution to the problem, The Sock Sack. Everyone has their own sock sack, when you take off your socks, you put both socks into your sack. When the sack is getting full, zip it closed and throw the entire thing into the washer and dryer. All pairs SHOULD be accounted for. Which SHOULD make for easy folding and putting away. And I can't even wait to try it out on tiny little baby socks!

We started this routine this week and so far it has been a hit. My boys even spent an entire morning searching for my dirty socks to put in their sack. I think I will eventually make a little fabric tag for each sack, but for right now this works great!

I found our sock sacks at Walmart in the laundry basket/ironing board aisle. These are the Mainstays Brand and they were 97 cents each. There was a Tide version, but they were like $4 each. I couldn't see any reason why these wouldn't work just as well and haven't had any trouble yet. 

Hopefully, this will simplify our sock problem, do you have any time saving laundry tricks? Have a great weekend!

2.17.2012

Organizing Our Home: Mini Fabric Bolts & Mini-Mini Bolts

I have to confess. I have A LOT of fabric. My husband might say that I have TOO MUCH fabric, but we can discuss that another day. The biggest problem with my fabric is that all the pieces are different. Some are just left overs from another project, some are fat quarters, and some are a few yards, just waiting to be cut and sewn. It seemed that no matter how I folded and piled, it never looked or was organized. I often knew (or thought I knew) that I had a certain piece of fabric, but then I couldn't find it. Or I would tear everything apart looking for it and end up frustrated and with a bigger mess.

I have seen a number of different ideas for making mini bolts, but I had a hard time finding the materials recommended or didn't want to spend that much money.

What you need:
20 x 30 Foam Core Board (I found mine at Walmart for under $2 a board)
Jumbo Paper Clips (found at Walmart in the Office Supply section)
Ruler/Yard Stick & Pencil
Sharp Knife

I first measured and drew out the cutting lines. The Mini Bolts measured 10 inches x 5 inches. I drew out all the lines I needed to cut on and then cut along the lines with sharp knife. Then I took a piece of fine sandpaper and gentle smoothed out the rough spots and edges.

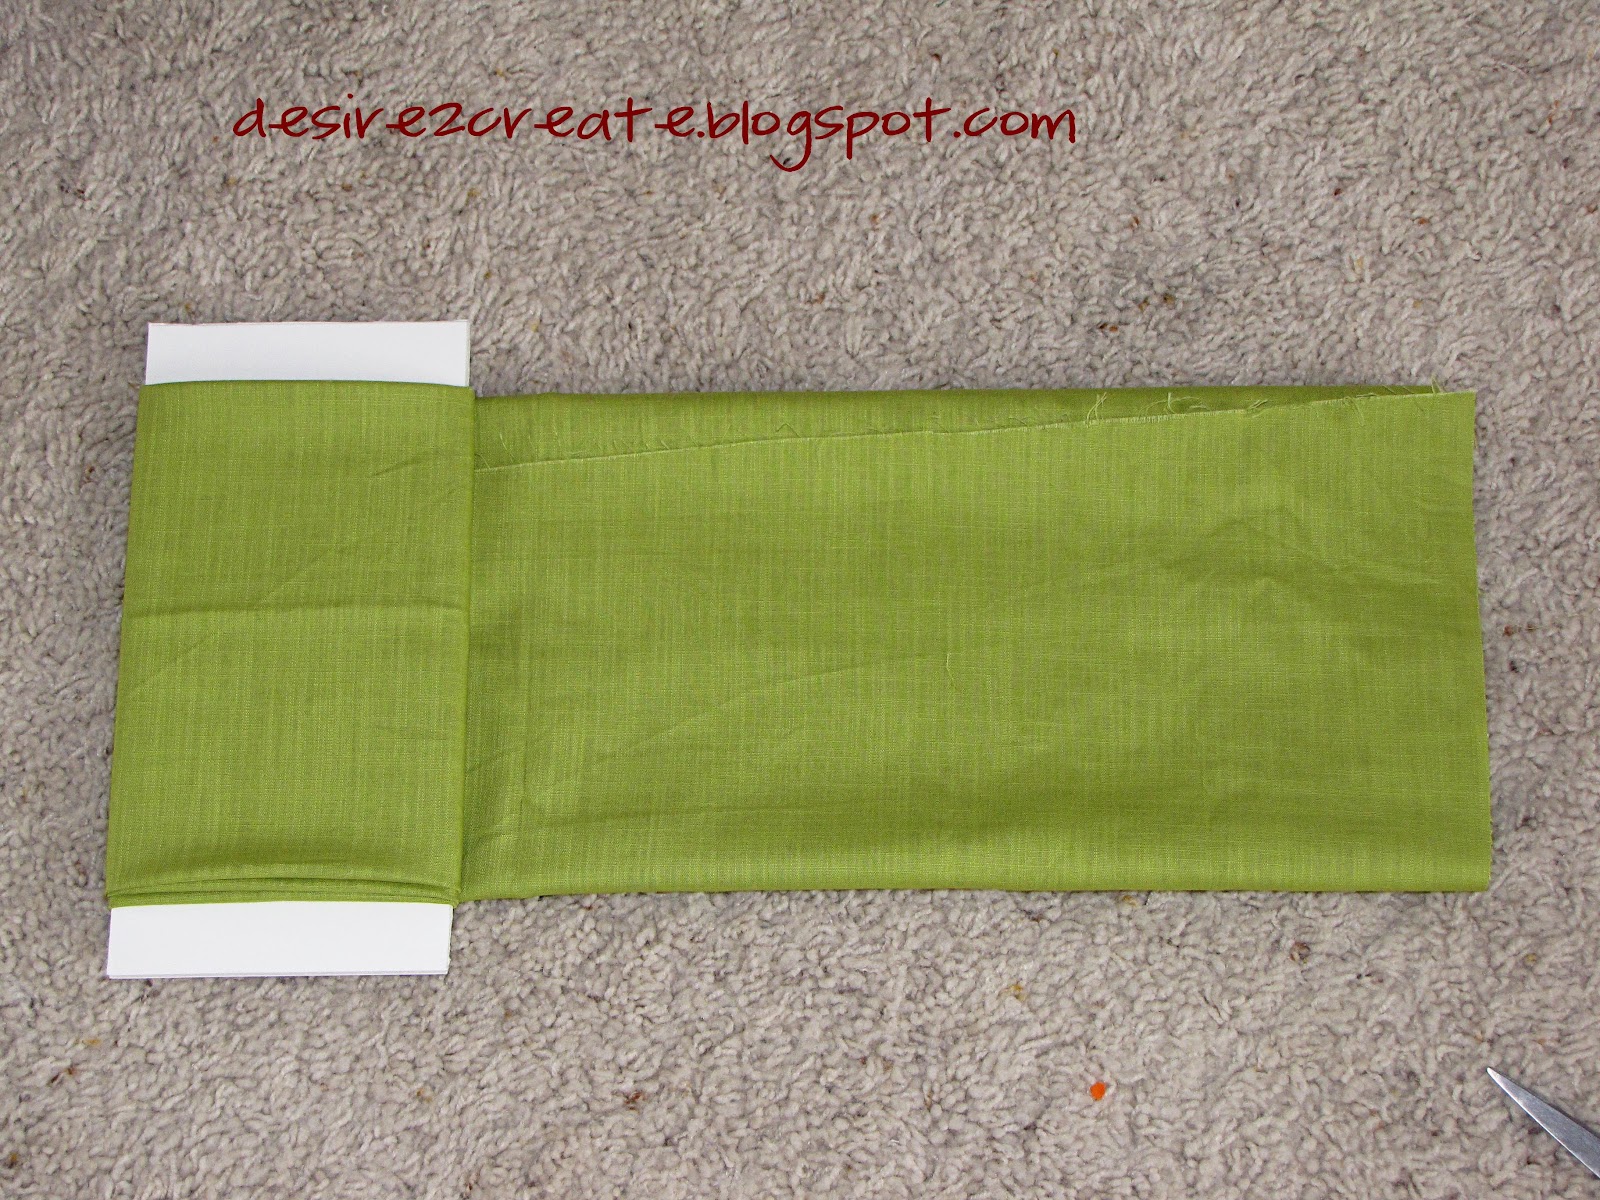
Then I took my fabric, layed it out flat, folded the raw edges to the center, and began wrapping it around one board. When I got the end of the fabric I folded the edges under and secured them to the other layers of fabric using the jumbo paper clips.


For the Mini-Mini Bolts: Draw lines that are 6 inches x 4 inches. And follow that same instructions for cutting and folding.

I found that I could fit up to about 2 yards of neatly folded cotton on a Mini Bolt and the Mini-Mini Bolts were perfect for fat quarters, 1/4-1/2 yard cuts, and smaller left over pieces.

I love how I can easily see and grab what pieces I need and how neat and tidy it makes my shelves look. And how inexpensive it turned out to be. Hope this gives you an idea of organizing your creative space, have a great weekend!

11.18.2011

Organizing Our Home: The Linen Closet

The Linen Closet is really a multi-purpose closet at our house. The sheets live here, as well as tableclothes, my coupon file, candles, and our family games. (Sometimes extra toilet paper, as you can see). But on my quest to be more organized, I had to tackle this closet and to tell you the truth I usually just close it and walk away.

I will make a confession, I hate folding sheets! The fitted sheets never turn out the same size as the matching flat sheet and they never look nicely folded. And then when someone goes looking for something (or climbs the shelves to try and get to the games) and sheets come falling out or they get stuffed back onto the shelf! Ugh, I just hated this closet!

So here is the BEFORE picture. EEK! How embarrassing!
 And the AFTER! Much better. So here is what I did. I first got this idea from here, which I found via Pinterest and then I have tweeked it to my own needs. The blue baskets are from Dollar Tree, yes the dollar store! Our store had a couple other colors, but I like the blue/turquoise best.
 I actually rolled on the sheets and pillowcases so that they fit into the round baskets and looked nice and neat. 
The labels were made with white cardstock, a $1 stamp set from Walmart, $1 ink from Walmart, and Jute Twine that I actually got for another project for Christmas (I'll share it later, of course if it works). I didn't want my tags to be too perfect and so I just stamped and inked the edges, then tied them on.
 Here is a close up. And these are the supplies from Walmart. 

I hope this inspires you to tackle your linen closet too. What is your secret for keeping a linen closet organized?

10.28.2011

Organizing Our Home: The Mail/Filing Center

I hate mail clutter, it drives me crazy and yet it is always there! But I am determined to stop it and here is our solution. A small 'Mail Center'. Our home is a split entry, so you open the front door and you are on a small (really small) landing and you can either go upstairs or downstairs. There really isn't any room for anything right there, so I had to move my solution to either the kitchen at the top of the stairs or the living room. The kitchen has been the drop zone for everything and it drives me crazy, so I am trying the living room, on top of the blue dresser I painted. 

I simply found a small filing box at Walmart, hanging folders and manila file folders. Labeled them and stuck them in. Unfortunately, the green of the hanging folders is really ugly and this is my living room, so I grabbed a piece of my favorite scrapbook paper and made a little slip-cover for the first file. I didn't even have to cut the paper, because the file was exactly 12 inches across and I just folded it to match the length. I can swap it out anytime I want a change, but it is much cuter than the army-greenish hanging folder.

The basket next to the file I have had for a long time and it has floated around the house trying to find a home.  It is divided into sections and works perfectly for holding some supplies needed at a Mail Center/Living Room. I put my can of febreeze spray in one spot, the address book, thank you cards and envelopes, sticky notes, 3x5 cards and my piano lesson calendar. This is also where I keep our bill paying envelope. 

It is simply a zipper pouch, I found this one on clearance for 10 cents at Walmart. Inside is everything I need to pay bills; check books, stamps, pens, and the chart where I keep track of our expenses and paid bills. It is so nice to slip the bills into the TO BE PAID folder and then on Friday, grab the folder and this pocket and I am all set... no searching for the check book or rummaging for a pen that works.

Now, you probably noticed that I DO NOT keep pens in the little basket out in the open. This is why.... He is 2 and likes to write "lists" and his "name" on everything, including his face, the walls, the couch, the windows, the tablecloth.... Hope you have a wonderful and safe weekend!

10.07.2011

Organizing Our Home: The Reward/Chore Board

Our children are still fairly small, but I think that it is never too early to start parenting and teaching. Recently, we have been dealing with frustrating power struggles and out of control tantrums and some just plain bad behavior. My husband and I came up with this system and it really has helped.


Each of our sons has a small lined notepad with their name at the top and when they obey, help, or do something that is good and we want repeated they get to put a star on their notepad and then I write what they did next to it. Likewise, they can also get frowny faces for doing things that deserve a frowny face. (We had a family meeting and the boys helped make family rules-so they know).

I think this is the real key to the system: Before bed each night, we sit down as a family and DADDY reads each boy's list and then we talk about it. We minus the frowns from the Stars and the boys get rewarded a penny for each. (5 stars-3 frowns= 2 pennies). The boys "sign" their name at the bottom of the day to say that they got their pennies and we start brand new and fresh in the morning.

This has worked really REALLY well with our boys, they love to use their "pennies" to buy a special treat or books at the D.I. and having to make an accounting with their Dad each night has made a HUGE difference.

To make the cute board in the hallway I:
           1. Sanded and Primed an old window
           2. Painted
           3. Distressed the edges
           4. This window already had funky nails and hardware on it, so I left it and that is what I hand their notepads from.
           5. Added the vinyl..... This phrase comes from a children's song that we sing when we are helping do our chores.... and they always get stars when helping do chores.
           6. Attached heavy duty hangers to the back of the window.
           7. Measured, installed wall anchors, and hung it up.

What works for rewards/consequences at your house?

9.30.2011

Organizing Our Home: The Junk Drawer

Something about the change in the season encourages me to change other things too. And lately I've been feeling the need to be more organized. Everyday I get asked, "Where are the scissors?' "Where is the phone charger?" "Have you seen the measuring tape?" "Do we have any tape?" "Are we out of batteries?" Most of these items usually reside in THE JUNK DRAWER. Do you have one? If not you are already way ahead of my family, to us this is the drawer in the kitchen set aside for things that are used often, but need to be stashed away quickly or a place for odds and ends that don't have an obvious home.

Lately, it has been driving me CRAZY! So, I decided to change. This was such a simple and quick change, but I absolutely LOVE how it is working out. The first thing I did was get an over the door organizer with clear vinyl pockets. I picked this one up at Walmart and there is a variety of sizes and styles, this one is more narrow to fit a narrow door in a hallway closet.


Then sort everything into the pockets. Some items got there own pocket, others I grouped into things that are used together; like measuring tape & stud-finder, highlighters, hole punch & white out, small hand tools, etc.

Then I used these adorable printable tags from eighteen25, labeled everything, and taped them into the inside of each pocket. So easy, but very effective. Now everything has a place and I can use the old junk drawer for something really useful. What tips do you have for keeping your family organized?

8.12.2011

To Do List

I am a list person. I like to check things off lists, but mostly I like to look back and see all things I got accomplished or what didn’t get done because I decided to play Rescue Heroes with my boys.
Unfortunately, most of my lists ended up on the back of envelopes, scrap paper or whatever else was handy. Here is an idea for a reusable/dry-erase To Do List that is cute enough to leave out all the time and maybe I will get more things done on the list because it is so cute!
IMG_0401
The first thing is I got this downloadable printable from somewhere and I have been searching and searching trying to find where is came from and I can’t find it again, so if you find it or know who made it let me know so I can link them and give them credit. There are TONS of printable To-Do lists out there or you could make your own.
The frame had been lying around for years, it was just plain wood and I didn’t really like it, but I knew I would find something to do with it (do you have things like that?)  So first thing I painted it glossy red, probably 3 or 4 coats, once dry I took sand paper to it. (I know the picture is blurry, but I wanted to show the distressing, I think our camera is about to die, it keeps acting weird)
IMG_0404
Then I just slipped the To-Do List behind the glass and put the whole thing back together. I already have dry-erase markers handy for use on our calendar, from here, so I am ready to start checking things off my list!
IMG_0407

12.30.2010

Grocery Bag Holder

As I was struggling to come up with ideas for homemade Christmas gifts, I stumbled across a tutorial for a grocery bag holder and thought of my mother-in-law. She has an abundance of grocery bags and no place to store them so I decided to make her one for Christmas. This idea comes from one of my favorite crafty blogs Make It and Love It. For the grocery bag tutorial and instructions... Go HERE.


This project was so simple and cute that I decided to make two more as gifts for other people. Originally I planned on saving all my grocery bags and stuffing them full so that the recipients would already have a bunch of bags for it.... but, I forgot. I now have hundreds of grocery bags piled in my garage and I gave out all my grocery bag holders. Hmmm, I guess I will be making another for myself very soon.

11.18.2010

Color Coded Bookcase....

I LOVE books! And because I love them so much I have A LOT of books. Which is wonderful, but it does cause me a lot of trouble when trying to organize my bookcase in a pleasing manner.
Then I had a thought....COLOR CODE it! I love to color code things (I even color code me and my husband's closet, I know I might need help).
So, if you are like me and need to change something up every now and then, try color-coding.... doesn't that look nice? (Now I know I need to get more Yellow books)

9.17.2010

Easy Job Chart

I really try to keep our home a happy and orderly place…some days are better than others… I really want to teach my boys good habits and how to be responsible for their own things and not expect me to clean up after them.

So to help my 2 year old start learning all of thee above, I put together this Job Chart.


What you need:

One Muffin Tin (I used a cheap kind & a regular size, you could use the mini ones too if you have older kids or want to put more than one kid’s jobs on the same tin)

Chipboard (or an old cereal box)

ModPodge & Brush

Scrapbook Paper

Pictures or Words of the Jobs

Stapler & Staples

Magnets


1. Measure how big your squares need to be… I actually just took a piece of scrap paper and made a template of how big I wanted them, then cute 12 squares out of your scrapbook paper.

2. Cut matching squares out of the chipboard

3. Adhere your words or pictures for you jobs with ModPodge (you could just use glue, I knew this chart would have to take a bit of abuse so I thought ModPodge would be best)

4. I used those free magnets you get from businesses for the back… I put the magnet on the back but on the bottom of the square, this helps to hold the prize in the cup when it is hung up… To hook them all together I used a simple stapler. It was fast, easy and boy-ish.

5. Put your squares over the cups, add a ribbon through the hole to hang and you are done.


My 2 year old has really gotten excited about this chart…why? Because I put his ‘pennies’ ( he will do anything for pennies right now-he loves to buy books from the DI with his own $$) right in the cup under the job. When he completes the task he gets to get out the penny and put it in his money jar. I have also been using single stickers, smarties etc.

5.27.2010

earring holder


I found this cute idea for a cheap and easy earring holder HERE...

You will need:
Old picture frames
Some leftover lace
A staple gun with SMALL staples
Spray Paint

I went to D.I. and found these two picture frames for a dollar each. I think it's a good idea to find pictures frames that are in fairly good shape and have interesting designs. The bigger red picture frame that I bought had cracks in the corners so spray painting it and making it look nice was a chore.

Next go get some spray paint. It took one can for me to spray paint the both of these. Apply several coats.

As you can see, in the top right corner of the bigger frame, there is a crack. That was hard to cover up.

I bought lace for less than a dollar at a fabric store. As you can see, you only need a little bit. I found a little leaf design in the lace and cut it to fit in the frame.

Next staple the lace on the corners to keep it in place. I then stapled left to right, top to bottom on the inside of the frame to make it tight. You will need the smallest staples possible so they don't staple through the frame. This part can be a bit tricky but have patience.

Voila! Here is the finished product: an EASY, super CHEAP (I'm talking less than 5$), and CUTE way to organize all your earrings.

4.23.2010

Family Calendar

Sometimes it is difficult making sure everyone in our family is on the same page...I wanted to have a Family Calendar, but I wanted one that was cute, easy, and cheap....So this is what I came up with....

What you need:

1 Picture with Glass (Plexiglass might work too) mine is 11 x 14 from Walmart

2 sheets of 12x12 cardstock

A ruler

Marker

Stamps (optional)

I first hooked my scrapbook paper together and then cut them to fit inside the frame...I traced the fake picture insert that came in the frame.

Then I marked out how big I wanted my calendar squares with the ruler and drew my lines with a magic marker....I used yellow because it matched my paper.

I then stamped my days on using a stamp kit by Autumn Leaves (I love it!)

Put it under the glass in the frame and hung it up!

I use a dry erase marker to write on the info...

I love this because I can change it with the seasons, add more decorations or keep it simple....