
Showing posts with label home decor. Show all posts

5.04.2012

Faux Bead Board Chunky Frame....

I have always liked the look of bead board. I've seen frames with bead board in them or made from bead board itself, but when I went to look at bead board at the home improvement store I realized I had a few problems. First, it comes in a big sheet, so I would need a big vehicle to get it home. Second, trying to wrestle it out of the truck alone once I got home. (I guess my 4 and 2 year old would be really helpful too) Third, it is really big and I wasn't sure how to cut it without having a table saw.

So, one night I was thinking about it and I came up with an idea. Make my own bead board look-a-like using paint sticks and bamboo skewers! I tried it and it totally worked! Here is a look at the finished product:
 This is an 8x10 frame, I pulled out the glass, then measured and cut the paint sticks. (I got these from Walmart, obviously, and the paint guy just gave them to me--he thought I was a little crazy, but I don't care.) I cut the paint sticks using a utility knife, just score each side and then break the end off. Same with the bamboo skewers (they come in a pack of like 100 for $1).

Then I lined them up in the frame; paint stick, skewer, paint stick, skewer.... and so on. The last paint stick had to be trimmed a little, but I just used the utility knife for that too. Then I glued them in using hot glue. Replaced the back of the frame. Then painted and distressed the whole thing.

I wanted the chunky layered frame look, but I wasn't sure how to attach the other frame to the front without making it too permanent--I like to switch out pictures a lot. And then I had a somewhat brilliant idea!
VELCRO! Yup, sticky back velcro dots. I put the scratchy side on the small frame and soft side on the faux bead board. It works GREAT! I can swap out the pictures whenever I want, the 2nd frame stays put and it was hard or complicated! I love how they turned out---I actually made 3 for our mantel.


3.03.2012

Dahlia Pillow

I have been wanting to create some new decorative pillows for our front room. Last week our youngest wasn't feeling well, so while Daddy and Brother went to visit Grandma and Grandpa I had time to work on a little something. I absolutely LOVE the way it turned out. And it was really EASY! A little time consuming, but not too bad, I had the whole thing finished in a couple hours.


What you need:
                              Felt (I had felt off the bolt, I had used it for something else, but I probably had about 1 yard         or so and I still have some left over. It depends on how big you want your pillow and how large you want your Dahlia.)
                              Pillow Form (I used a really ugly santa pillow that someone gave to us, made a perfect form and was free)
                              Scissors
                               Hot Glue Gun & Glue
                              Sewing Machine, to actually sew the pillow slipcover
                              Some decoration for the center, I used beads, but a big button or anything would work too.


First, figure out how big you are making your pillow. I simply took the ugly pillow laid it onto my felt and traced around it, then added a little for a seam allowance. This was my front. For the back you have 2 options. You could simply do the same thing again and have a completely solid pillow or you can make a slip cover. To do the slip cover I took the front I had just measured and traced it again, then added extra for over lap and seam allowance, about 3 1/2 inches, but only to ONE side. Then I simply folded that piece in half and cut along the fold making 2 equal halves.

**here is where I would do something different. I created my Dahlia first and then sewed the slipcover together, it worked but was extra tricky not to sew over the petals, so in the future I would quickly sew the slipcover together.

               1. Take the back halves and gently fold over just a bit and sew. This is the part where you slip your pillow form in and out, so it needs to be finished.
                2. Then lay both back halves onto your front piece, making sure that the outside corners are perfectly aligned. The back pieces will be bigger, so align the outside corners and then put one side of the halves under and the side over and pin around.
               3. Sew the entire way around the pillow, remember to back stitch. Clip the corners, turn right side out.


Now for the fun part. I traced a circle using a dinner plate where I wanted my Dahlia to be. I didn't want it center for a couple reasons, I was worried that it might become slightly offer center and drive me crazy and I actually really like the offer center look.

Then cut your triangles. Bigger for the outside and then getting slightly smaller as you work toward the center. I experimented a little, until I had about the size I wanted, but mine are not all the same or perfect. I just quickly cut triangles about the same size.


To make the petal, fold one bottom corner in to the center and glue (JUST A LITTLE GLUE) and then fold the other petal into the center and glue. And that is one petal. Then glue it onto your slipcover along the line you made. And repeat working slowly inward, until you get to the center and add your embellishments. I used beads and just hand sewed them on.

Slip your pillow form inside and you're done!

2.04.2012

Valentine Wreath....

I wanted to make a wreath for our mantel for Valentine's Day, but I didn't want to spend a lot of money or time or brain power working on something. I am really happy with how this wreath turned out and it didn't have to be 'perfect'.

Here's what you need:
Coffee Filters (They come in a huge package, this was actually left over from another project I did)
Fabric Dye (I used Tuplip Red and found it at Walmart)
Hot Glue Gun and Glue Sticks
Scissors
Wreath form, whatever size and shape you would like

FIRST: you need to dye your coffee filters. This isn't hard and it doesn't have to be perfect. I used a large plastic tub in my sink. I DID NOT use all the dye. Just a bit, until it was the color I was looking for. I put about a tablespoon of salt in the tub, then the powdered dye, and added about 2 cups of boiling water. I stirred until it was all dissolved.

You MUST WEAR GLOVES! I wore throw-away medical gloves, but it doesn't really matter what you wear, just wear gloves. I dripped some on the back of my hand and could not get it off, it is slowly fading, but still there.

Add the coffee filters to the tub of dye. Make sure that they are fully covered, move them around and let them sit for as long as you like. The longer they sit in the dye the darker they will be. I did 3 batches of coffee filters, the first I let sit the longest time, and then less time and less to get a multi-shade look. 

(Sorry there are no pictures of this, but I was home alone and I didn't want to dye my hands or my camera)

Over the tub ring out the coffee filters, they are amazingly strong and I just rung out all the excess moisture. And then place them in another dry tub or bucket (remember nothing that you love it might be dyed for a while).

Once I had all the coffee filters rung out, I threw them in the dryer. Yes, my clothes dryer. I adjusted the temp to be low-medium and then let them tumble around. But watch them, this is probably a no-no and a fire hazard, so don't leave your dryer unattended. But it only took a few minutes for the coffee filters to be fluffed and dry.

Now it is time to make the ruffley-flower things for the wreath. First, fold a coffee filter in half.
 Then cut it along the fold. Now you have 2 halves.
 Fold one half in half like this.
 Then in half again.

 Then twist the pointed end. If you don't want your wreath to be real fluffy, twist it more. If you want fluff, twist less.
 Snip off the pointy part with scissors.
 Then hold the twisted part and pull apart all the the different folded layers to look like this. Then glue it to the wreath form with hot glue. And repeat until your wreath is full. 
I added a small piece of ribbon to the back for hanging and you are done! Enjoy!

1.31.2012

Butterfly wall decor

Oh Pinterest. Who really can be bored today now that we have Pinterest? You don't even have to do any of the crafts. You could just oogle all day long at things that you could, would, want, hope, to do. I do this thing where I try to hold out as long as I can when I really want chocolate (I always hope to make it after the kids are in bed....) and I find myself doing the same thing with Pinterest. How long can I resist before I go back and spend the rest of the afternoon sifting through the goodness?!

And on that note here is a craft for my wall that I found on Pinterest. When you're renting you're so limited and have to be clever in how to make your home more livable!


I saw this idea and thought I'd give it a try. In the picture I found they made their butterflies out of soda cans. I don't drink nearly enough soda to attempt this any time soon so I made my butterflies out of card stock. I chose white although I preferred black. I would suggest picking a color and sticking with it because I cut out about 50 butterflies and that took several days. I painted about half of my butterflies black when I had this idea to paint half of them black and look like the white ones escaped out of the paint. I kind of like how it turned out. I may make some of the escaped white ones colored as well and make them a bit wild. If I do I will post the updated version. But anyway, this is pretty straight forward. I printed off some butterfly shapes I liked and had about 8 different shapes. Then I traced 50 butterflies, cut them out and pinned them on the wall with sewing pins. (Poke right through the paper and into the wall) I let them stick out a little to give them a little dimension. In the future I would have glued them to the push pins first because they had a tendency to tilt downwards when I didn't want them to. To get the design I wanted I used a pencil on the wall to draw it out and then pushed the pins along the design. Overall I'm pretty pleased with how it turned out.

12.02.2011

Christmas Wreath...

I love decorating for Christmas, it is my favorite holiday, and I like to do a few new things every year. This week I worked on this wreath to put above our fireplace. It was really simple and worked up pretty fast.

Here's what you need:
Hot Glue Gun and Glue
Cardstock or Cardboard for wreath base
Scrapbook paper (I used 4 sheets of double sided Christmas paper)
Large Circle Punch (or scissors and patience)

The first thing I did was make my base. I had originally dreamed this wreath would be made on a foam wreath form. Unfortunately, the store I usually get them from doesn't carry them anymore and the next closest store is and 1 1/2 hours away. So I improvised. I used a piece of heavy brown cardstock. I used a large dinner plate to trace the first line and then a bowl for the center line. Then I just cut it out with my scissors.
 Next you need to make the 'leaves'. I used a large (3 inch-ish) cirlce punch. You could free hand cut them if you are patient enough or use a craft cutter. The punch worked great for me. I cut a large circle first.


Then slide the circle back into the punch, but only part way to make the leave shape. I could get 3 large leaves out of each circle or 4 smaller ones.


To give the leaves shape, just pinch one end of the leaf. Then start gluing leaves around the outside of the wreath edge.
 This is how the first layer looks around the outside edge.
 The second layer I flipped the leaves the other way and glued them in bunches of 2 leaves and then 3 leaves. Layer 4 was the same direction as Layer 1, but I put the leaves on an angle overlapping the the previous one. And the last Layer, over lapped the previous leaf and then I folded just a little bit under and glued towards the back of the wreath.


And here is the finished wreath!. I hung it with a thin gold wire to the front of an antique cupboard door and then set it on our mantel. I hope you all have a fun time decorating and creating for Christmas!

9.13.2011

Table centerpiece

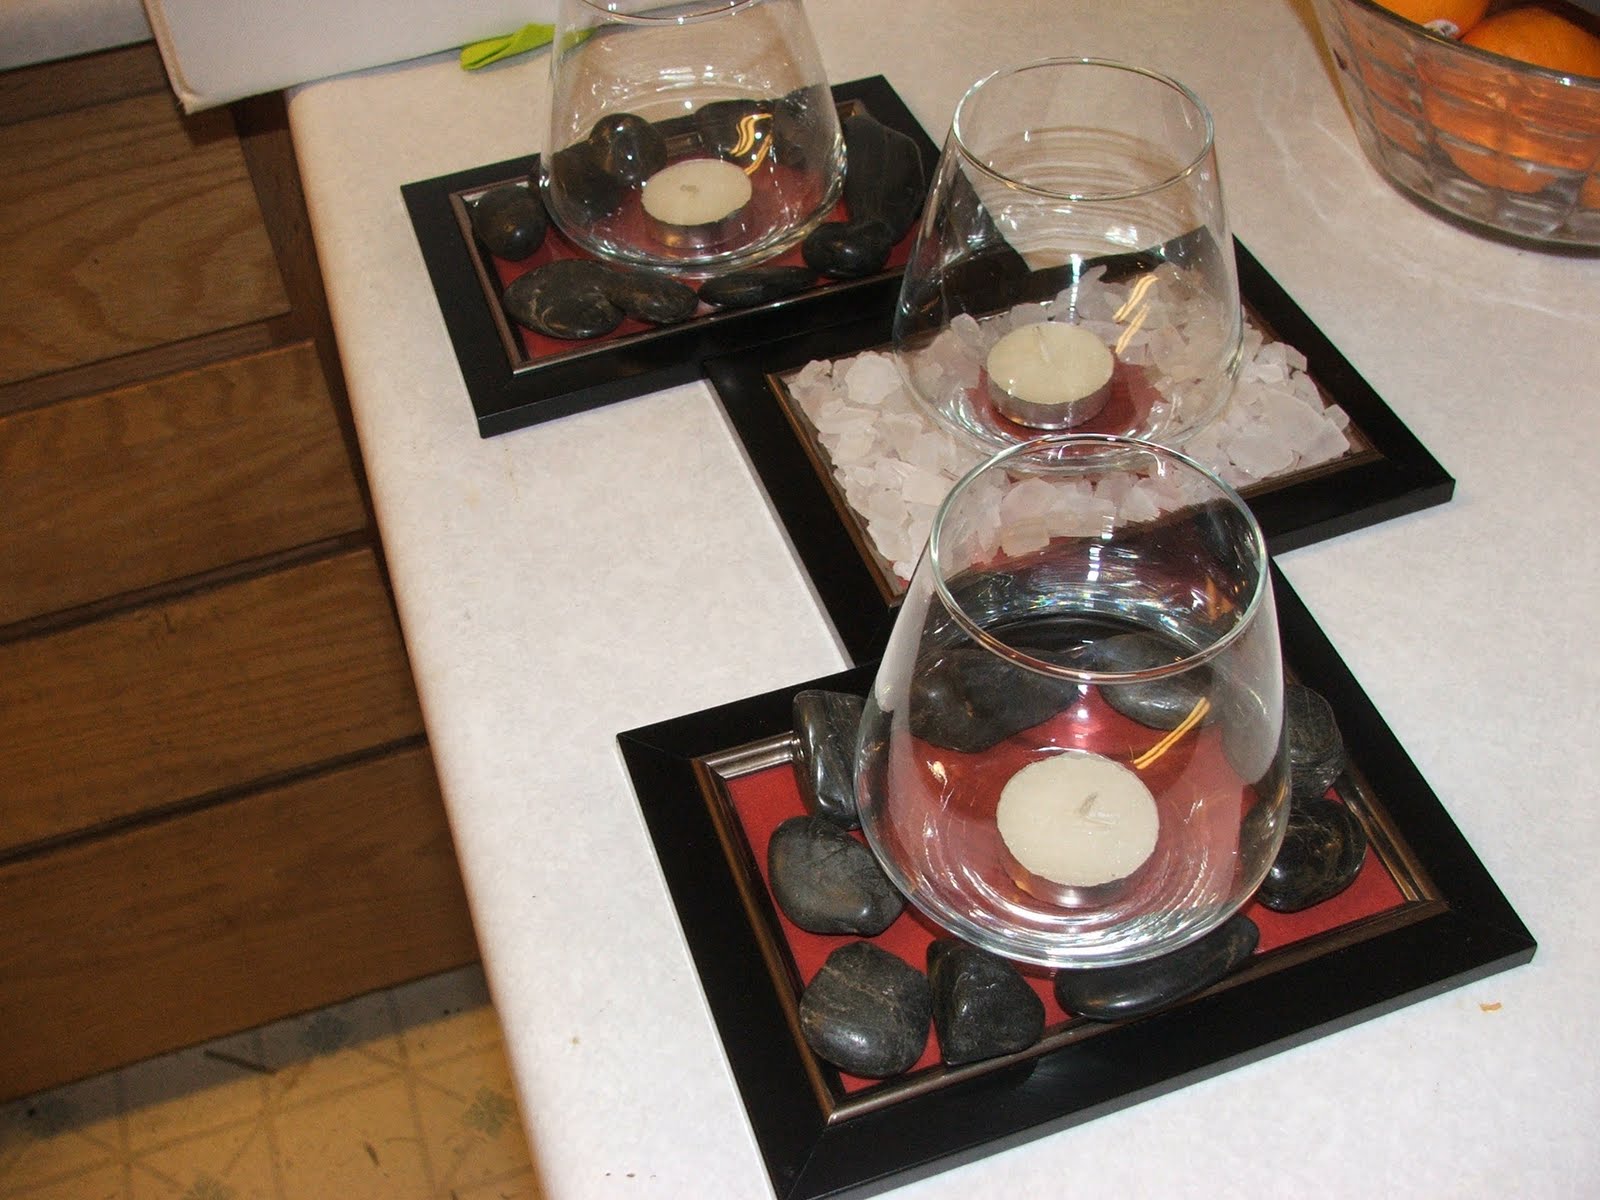
For this project you will need a 4x6 picture frame, a coordinating color of paper to fill the frame, a candle globe, a candle, and any color or shape of rocks (I chose black river rocks and small white chips.)
It is very simple, I just replaced the picture frame with the color of paper, in this case I went with red. After that I placed the candle globe on the frame and then spread the river rocks around the globe. Finally I placed the candle inside the globe. As an after thought I put large pieces of cloves inside the globe to give it a fall smell when the candle is lit. In the future I would have also chosen larger candles, maybe a votive red. The neat thing about this centerpiece is it is very interchangeable with the seasons. The paper in the frame can be a darker color to coordinate with the coming fall or even a festive orange or a pastel for spring. The rocks can also be changed out for another kind giving you another look also. I struggle with commitment so this works very well for me!! I also chose to go with three and arrange them together. They aren't glued together so they can be placed alone in a room or together. I really liked how it can be changed around when I am feeling the need for something new.


8.26.2011

DIY Fabric Art

I found this fabric a while ago and I LOVE the colors. I have been trying to decide just what to do with it. I knew I wanted something for our living room, but I wasn't sure what, until this idea came to me. 

All you need:
         A frame
         Fabric strips
         Sewing machine or your could use hot glue or fabric glue
       
The first thing I did was paint and distress my frame, it was boring old black, so I painted it red, distressed it and then finished with a glossy clear coat.

Then I cut a piece of cardstock that was same size as my frame and I cut strips the width of the cardstock. My fabric was already in strips because it was part of a jelly roll pack, but I did cut some of the strips thinner. Then lay out the strips so you can get the look you like.

Then start sewing (or glue) the fabric strips to the cardstock. Layer the next strip and sew and so on until the cardstock is covered.


Slip it into your frame and you are done! This could totally be done with just scraps and what it in your stash. Hope everyone has a great weekend!

7.20.2011

Table Runner


I have wanted to make a table runner for a while now. I was looking online at different ideas and found one here I was really pleased with mine and it didn't take very long to put it together; 3 hours maybe from cut to finish. I may have to make one for each holiday now so I can decorate.

Materials
Solid Color canvas: 5/8 yard
Print canvas: about 3/4 yard total, I bought 4 different coordinating fabrics, each 7" wide and it was enough to make 2 runners
2 1/2 yards of 1/2"-wide rickrack trim
Thread in coordinating color

Finished Measurements: Approximately 14" wide X 41" long

Cutting Instructions
Out of the solid, cut 42 x 20. Each print fabric should be cut to 6 1/2" x 9".

Sewing Instructions
With right sides together, sew the print fabrics together along the 9" side with 1/4" seam allowance. Do this with each rectangle until they are all connected. Press seams open.


Topstitch the seam allowance down on each side of the seam, 1/8". You can kind of see the end result in this the picture below.


Now on to your solid fabric. Along the 42" edge (the longest edges), attach your rick rack to the right side of the fabric. Line the end of the rick rack up with the edge of your solid fabric. Sew 1/8" from edge as shown in the photo below. Do this on both long sides.


With right sides together, align the printed fabric with the edge of the solid fabric; the rick rack will be in the middle. Stitch 1/4" from the edge. Do this to both sides; it will create a tube.


Press the seam allowance toward the printed fabric (center panel), then turn the runner right sides out. Press the seams and rick rack again. You want the rick rack to go towards the solid fabric. Be careful not to iron the edges of the solid fabric and create a crease. I had trouble getting the crease out.


Topstitch along the long seams, across from the rick rack. DON'T SEW THE BACK TO THE FRONT IN THIS STEP. It's kind of difficult to scrunch all the fabric up to top stitch. Just go slow and be patient.

Turn your work inside out again and center the print fabric so there is 3" of solid canvas on each side fo the palen. Align and pin the short end of the runner and sew across the end with 3/4" seam allowance. Repeat for other end, leaving 5" open for flipping. Flip right sides out and press the edges, measuring again so there is 3" of solid fabric along the length of the runner.

Fold in and pin the seam allowance at the 5" opening. I liked the runner I made that wasn't topstitched around the runner. You may choose to top stitch 1/8" from the edge around the entire runner. OR I chose to whip stitch the 5" opening closed.

7.15.2011

Dresser Re-Do....

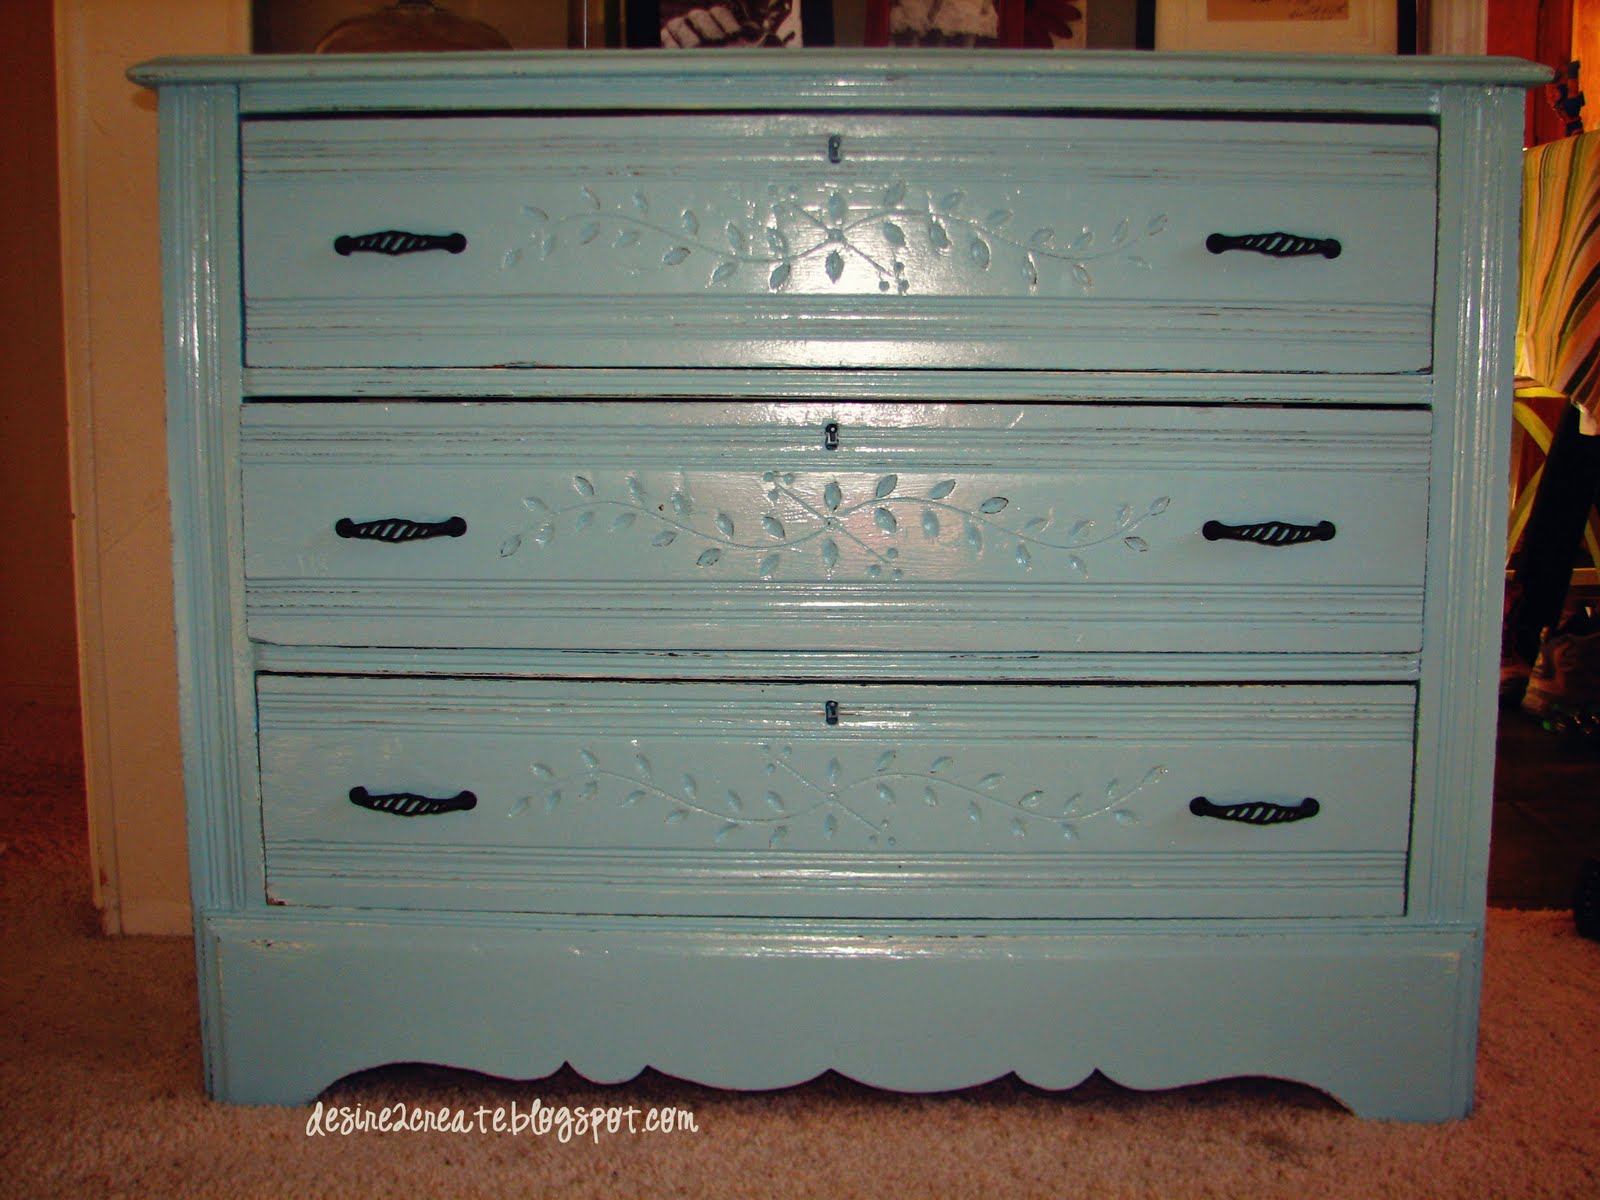
I found this dresser at the D.I. (Deseret Industries, a donation/thrift store) and fell in love with it. It needed some love, but I had a vision and I LOVED the price.


I fell in love with the decorative details, the carved leaves on the front of the drawers and the trim on the bottom. The first thing I did was take off the handles, then I started sanding and filling and repairing. Some of the drawers needed some repairing. Then I started priming. I primed everything really well. Using KILZ white primer. 
 After it was all primed, I started painting. I actually used spray paint (KRYLON, Blue Ocean Breeze, Gloss). I used a lot of thin coats to prevent drips and I let it dry well between each coat. Here is a picture of it painted and waiting to be distressed.
 Next, I took sandpaper to distress the edges and details. I really wanted the dress to still look old and so I didn't sand out all the imperfections before I painted.
Next, I added the new handles and moved it into our living room. I love how much this piece has changed the look of our living room, it is so bright and cheerful!

Linked Up Here: