Showing posts with label Lindsey. Show all posts

11.21.2011

Pumpkin Streusel Pie

Well I am gearing up to make pies for Thanksgiving this year. Over the weekend I practiced making a new crust and a new Pumpkin pie recipe. First, you must start with the crust. This is a delicious, no-trans-fat recipe that will melt in your mouth. I got the crust recipe from a friend at work--thanks Ruth. The pumpkin streusel I found at this website.


Crust:
2 2/3 cup flour
1 1/2 tsp salt
2/3 cup OLIVE OIL (regular, not light tasting or extra virgin)
4-5 TB ice cold water

In a large bowl, combine flour and salt. Stir to incorporate. Then add your oil and 4 TB water. Mix to incorporate. Try not to overmix or it will make your dough dry and less flaky once cooked. If your dough looks dry, add UP TO 1 TB more water. Once everything is mixed in, cut ball of dough in half. Roll out one half between 2 pieces of plastic wrap. Using the plastic wrap, flip crust into pie pan. If you need a pre-baked crust (such as for a cream pie), bake at 475 degrees for 12-15 minutes.

Pumpkin Streusel Pie
1 can (16 ounces) pumpkin, or 2 cups puree
1 can (14 ounces) sweetened condensed milk
2 eggs, beaten
2 teaspoons pumpkin pie spice
1/2 teaspoon salt

Heat oven to 400°. In a large mixing bowl, combine pumpkin, sweetened condensed milk, eggs, spices, and salt; blend well.


Pecan Streusel Topping
1/2 cup firmly packed light brown sugar
1/8 cup white sugar
1 tsp vanilla
1/2 cup flour
1/2 cup firm butter (I thought this was too much, my mixture never got crumbly so I would suggest starting with 1/3 c butter)
1/4 cup chopped pecans
1/4 cup macadamia nuts chopped
1/2 cup coconut (sweetened flaked shredded)

Streusel topping: Combine brown and white sugars, vanilla, and flour; cut in the butter until crumbly. Stir in chopped pecans, macadamia nuts, and coconut. Set aside. (I used chopped walnuts and almonds and it was still yummy).

Pour pumpkin mixture into the unbaked pastry shell. Place a rack in the middle of your oven and one a step or two higher. You want the pie to fit on either rack because you are going to move it to the top rack at the end of baking.

Bake for 15 minutes on middle rack.

Reduce oven temperature to 350°. Bake for 25 minutes longer.

Next sprinkle streusel topping over pie. Move to higher rack and continue baking at 350° for about 15 to 20 minutes longer, or until golden brown and the filling is set.

I had several people who are not Pumpkin pie lovers tell me this pie was not too pumpkiny. They really enjoyed it. Delicious with ice cream or whipped cream. Enjoy!

7.20.2011

Table Runner


I have wanted to make a table runner for a while now. I was looking online at different ideas and found one here I was really pleased with mine and it didn't take very long to put it together; 3 hours maybe from cut to finish. I may have to make one for each holiday now so I can decorate.

Materials
Solid Color canvas: 5/8 yard
Print canvas: about 3/4 yard total, I bought 4 different coordinating fabrics, each 7" wide and it was enough to make 2 runners
2 1/2 yards of 1/2"-wide rickrack trim
Thread in coordinating color

Finished Measurements: Approximately 14" wide X 41" long

Cutting Instructions
Out of the solid, cut 42 x 20. Each print fabric should be cut to 6 1/2" x 9".

Sewing Instructions
With right sides together, sew the print fabrics together along the 9" side with 1/4" seam allowance. Do this with each rectangle until they are all connected. Press seams open.


Topstitch the seam allowance down on each side of the seam, 1/8". You can kind of see the end result in this the picture below.


Now on to your solid fabric. Along the 42" edge (the longest edges), attach your rick rack to the right side of the fabric. Line the end of the rick rack up with the edge of your solid fabric. Sew 1/8" from edge as shown in the photo below. Do this on both long sides.


With right sides together, align the printed fabric with the edge of the solid fabric; the rick rack will be in the middle. Stitch 1/4" from the edge. Do this to both sides; it will create a tube.


Press the seam allowance toward the printed fabric (center panel), then turn the runner right sides out. Press the seams and rick rack again. You want the rick rack to go towards the solid fabric. Be careful not to iron the edges of the solid fabric and create a crease. I had trouble getting the crease out.


Topstitch along the long seams, across from the rick rack. DON'T SEW THE BACK TO THE FRONT IN THIS STEP. It's kind of difficult to scrunch all the fabric up to top stitch. Just go slow and be patient.

Turn your work inside out again and center the print fabric so there is 3" of solid canvas on each side fo the palen. Align and pin the short end of the runner and sew across the end with 3/4" seam allowance. Repeat for other end, leaving 5" open for flipping. Flip right sides out and press the edges, measuring again so there is 3" of solid fabric along the length of the runner.

Fold in and pin the seam allowance at the 5" opening. I liked the runner I made that wasn't topstitched around the runner. You may choose to top stitch 1/8" from the edge around the entire runner. OR I chose to whip stitch the 5" opening closed.

4.25.2011

Egg Rolls


I found the recipe here
This recipe will make 50-100 small egg rolls or the rolls I made were pretty big so it only made about 35.

1-2 packages spring roll skins
2 packages vermicelli (or Muong Bean Thread noodles) noodles (6 ounces total)

2-3 pounds meat (I used 2 rolls sausage, cooked)
1 head of cabbage, shredded finely (or use 1 10-ounce package of pre-cut cabbage)

4 whole eggs

3 egg whites (save the egg yolks for sealing the egg rolls)

1/2 pound carrots, shredded finely (or use the 10-ounce bag of shredded matchstick carrots)

1/2 onion, finely chopped

Put the vermicelli noodles in a large bowl and pour hot water over noodles and let soak for 15-20 minutes (if using boiling water, soak for 10 minutes) If it soaks too long the noodles will be mushy. Once soaked, drain very well and chop noodles up a bit into 2-3 inch pieces (not too short).

Mix all the above ingredients (cooked noodles, cooked meat, cooked cabbage, whole eggs, egg whites, carrots and onion) in a large bowl. Hand mixing works best. Then add:

1/2 tablespoons salt

¼ cup oyster sauce

4-5 tablespoons black soy sauce (I have trouble finding this so I just use normal soy sauce)

1 tablespoon black pepper


Mix together.
Pull apart spring roll pastry wraps. These were the ones that I found at Macey's in the Asian food isle toward the floor.


The spring roll skins work best when soaked (for 5 seconds) in water. I used a plate with water in it and rubbed the water around the edges. It is most important that the edges are wet so they don’t crack when you roll them up.
Fill each wrap with 3-4 TB of egg mixture (for medium sized rolls).


Heat canola or vegetable oil (I always use canola oil) 1/3 full in pot. I would suggest using a Fry Daddy. Heat the oil to about 375 degrees. Fry egg rolls until golden brown and cooked through. Constantly turn the egg rolls so they don’t overcook on one side. Drain on crumpled paper towels and enjoy.

I did try to bake some so they weren’t so greasy. I found it worked best when I brushed each with oil and bake at 415 degrees for 35-45 minutes. Flip over halfway through the cooking time. Make sure the rolls aren’t touching or they will stick together.

These were a really big hit with my family and friends. They did require quite a bit of time, but I had my husbands' help that made the work fun and the time go by quicker.

11.29.2010

Diaper Holder


Well since I have a few friends and family members that are expecting babies, I wanted to make them something cute that they could use. These diaper holders are great for quickly grabbing diaper and wipes all in one.I found the idea here.

What you will need:
Sewing machine
Thread
Fabric

Fabric you will need:
Sixteen 4X4 squares
Two 5 wide X 8 long (you will fold this piece in half, long ways)
Eight 4X4 squares of flannel to add thickness and color
Two 2 1/2 wide X 8 long of flannel to add into the top pieces

(I bought 2 fat quarters of the pink and orange, 1/3 yard of the green, 1/3 yard flannel, and 3/8 yard of the brown and I made almost 3 holders)


Layer each of the squares for sewing. The bottom will be the inside of the holder, lay face down. Then add flannel and the top piece. For top piece lay flannel in between the fold.

The Lil' Luna blog has a good example of how things are supposed to be sewn together.

After you have your squares laid out in the order you want them sewn them together, take the bottom 2 squares and sew them together with 1/2 inch seam allowance. You want the seam to be on the outside. Then match the top 2 squares together and do the same thing, be sure to keep the seams open. The top strip will then be attached to the top blocks.


Repeat these for side 2.

Sew the 2 sides together with 1/2 inch seam allowance, leaving the seams open.


Clip the seams about 1/2 inch apart. Once you wash it, the ends will start to fray and it will look like a rag quilt.


The case can hold 4-6 diapers or 2 diapers with a wipey case.

10.11.2010

Glittered Pumpkins


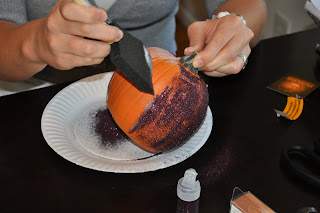
I found this very cute, creative idea for glittered pumpkins here.


Supplies:
Real or fake pumpkins (I used fake ones from JoAnns)
Elmer's glue
Powdered or very fine glitter
Paint Brush
Paper plates or newspaper
Black or brown craft paint


Paint your pumpkin with glue, one section at a time. Be sure to get the glue in the ridges of the pumpkin so the glitter will stick. Dump glitter on your pumpkin. Allow to dry for about 1 hour. Then paint the stem with the black or brown paint. Depending on the type of glitter you use, and whether you want to keep your pumpkins for next year or not, you may have to spray it with paint lacquer to keep the glitter on.


**I first started just sprinkling it on but it was hard to make it look even. I ended up having to go back and paint over a few spots that already had been glittered and the new glitter I put on had a hard time sticking. Play with it and see what works for you.

10.04.2010

Chocolate Raspberry Sundae Topper

I found this recipe during the summer while I was working as a food preservation specialist in Salt Lake. Its something different and fun that you can preserve and eat throughout the year. It is also super tasty. NOTE**Due to their low acidity, most homemade chocolate sauces are not suitable for safe home canning. This recipe has been tested by the USDA and it is safe as long as you follow the directions.*


Ingredients:
1/2 cup sifted unsweetened cocoa powder
1 package powdered fruit pectin
4 1/2 cups crushed red raspberries (I used strawberries)
4 TBSP lemon juice
6 3/4 cups sugar

1. Prepare canner, jars and lids. I just keep my warm in the hot water bath or in the sink with hot water.

2. In a medium glass bowl, combine cocoa powder and pectin, stirring until evenly blended. Set aside.

3. In a large sauce pan, placed crushed raspberries and lemon juice. Whisk in pectin mixture until dissolved. (If you used a Teflon coated pan, don't whisk too hard or you will have flakes of Teflon in your topper). Bring to a boil over high heat, stirring frequently. Add sugar all at once and return to a full roiling boil, stirring constantly. Boil hard for 1 minute, stirring constantly. Remove from heat and skim off foam.


4. Ladle hot sundae topper into hot jars, leaving 1/4 inch headspace. Remove air bubbles and adjust headspace as necessary. Wipe rim. Center lid on jar. Screw band down until fingertip tight.

5. Place jars in boiling water bath. Make sure your jars are covered with 1 1/2 inch to 2 inches of water. Bring to a boil and process for 14 minutes. (This time is for altitudes 4000 feet above sea level. You would only need to process it for 10 minutes at sea level. Add an additional minute for each 1000 ft above sea level).

6. After the required processing time, turn off the heat and remove the canner lid; wait 5 minutes. Remove jars and allow to cool for 12-24 hours. Remove screw bands, wash well and store. *Don't store with the screw bands on jars. This will prevent mold from getting into your food. It also helps you to know if a jar has gone bad if the food is spilling out of the edges.


This recipe makes about six 8-oz jars. They are best used within a year, but will last for longer than that. Just remember to rotate your canned goods and you should be fine.

7.12.2010

Antique Pictures


I made my first antique picture at a work party I had--the idea came from one of the ladies I work with. It's a really fun idea that can turn an ordinary picture into a unique antique.


What you'll need:
Canvas panels- lots of different sizes at most craft stores, my boards are 8 X 10
Modge podge- the regular stuff works best
Sponge brush- i notice the wider the better
A picture printed on normal printing paper-not on photo paper
An old credit card or hotel key
Razor blade or sharp knife

Start by painting a thick layer of modge podge on your canvas board. This will be your glue holding your paper to your board.


Even out the modge podge by running your brush once over the entire board. Place your picture on top of the board. **Make sure it's even the first time because you will have more bubbles if you pull the picture off and try to stick it back on and because we will be cutting off some of the edges.**


Smooth out your paper with a plastic card of some type. BE CAREFUL NOT TO RUB/PRESS TOO HARD BECAUSE IT MAY RIP THE PAPER OR PEEL OFF SOME OF THE COLOR.


Paint a couple layers of modge podge across the top of your paper. This will also help it stick and it creates that antiqued look. The more modge podge you put on top, the glossier your picture will be.

Let your picture dry for at least 24 hours.


After 24 hours, place your picture face down on a cutting mat. Using a razor blade, cut around the outside of your picture. The dried modge podge will be kind of hard to cut through so you have to press kind of hard.


Now to display your picture I thought of a couple options. You could hang it from ribbon, find a picture frame or you could use an unfinished frame glued to the back. If you think of any other fun options, please let me know.

6.21.2010

Fresh Flowers

Don't you love it when you have a beautiful bouquet of flowers, but hate it when they die within 3 days of having them? I have a problem getting my fresh flowers to last. I went to a conference for work last week and I attended a Floral Design class taught by the BYU Campus Crafts and Floral.

First of all, don't be afraid to cut your flowers and rearrange them in a more pleasing way. You can be much more creative than removing the cellophane wrapping and putting it in a vase.

To keep your flowers fresh longer:
~You don't want the green leafy parts of your flowers to be in the water. This creates more bacteria which kills your flowers faster.
~Keep your flowers in warm water; you want it to be warmer than your body temperature.
~Cut ends of flowers every day.
~Change the water every day. If you can, clean the vase with soap and water to get rid of the bacteria.


I practiced some of the skills I learned from that class and from Keri's post about floral arrangements and got to work.

6.07.2010

Steamed Chocolate Pudding

On Sunday, Tyler and I were craving something sweet and chocolaty. I made this in my cooking class last semester and loved it. I decided to try it again on my own.


Ingredients:
1 egg, beaten
2 oz butter, melted (about 1/4 of a cup)
3 Tbsp sugar
½ cup milk
3 Tbsp cocoa powder
½ cup flour
½ tsp baking powder
1/4 cup fresh or frozen (thawed) raspberries, strawberries, mixed berries, etc
extra sugar for berries

Instructions:

1. Place berries (about 1 TB) into the bottom of each of 5 Pyrex custard dishes (Any dish that can withstand heat will work but it can't be too big or the middle won't cook completely--I used a 5" round dish that I have used to make cakes). Sprinkle sugar over top and let sit.

2. Combine first 4 ingredients in a small bowl. In a separate bowl, sift together dry ingredients (You don't have to use a sifter, a whisk will do the same exact thing). Add the sifted mixture to the liquids and mix. (There should not be any large lumps, but don’t over-mix the batter). Divide the batter evenly between the 5 dishes and smooth out the top.

3. Fill a small hotel pan (or large pot) with 4 – 5 cups water and heat until boiling. Position a cooling rack over top of the pan and arrange the custard dishes on the rack so they are directly over the boiling water. Cover with an aluminum foil tent and reduce heat to low (you should still be able to hear a gentle bubbling sound if you put your ear close to the pan). Cook 20 minutes. (With my 5" dishes I had to cook mine for 35 minutes). You know when it is done when you insert a toothpick into the center and it comes out mostly clean. The texture of this dish is kind of like a very very moist cake, never runny though.

4. Cut around edges with a knife and flip on plate to serve. Serve with whipped cream, raspberry syrup or powdered sugar, if desired.
I added extra strawberries on the bottom of my serving dish so I had strawberries on the top and bottom of my dessert.

WARNING
: This is a chocolate overload. It is so delicious, but VERY chocolaty so you might want to have a tall glass of milk to help wash it all down.

5.25.2010

Our Second Giveaway

As a way to attract more people to our fun blog, we will be giving away flower hair clips like these. I know lots of people are often in need of a last minute gift and many people desire to have some of these cute flowers of their own, so enter today! If you would like to win these hair clips, leave a comment below and you will be automatically entered to win.


Additional entries will be given for:

1. Blogging, Facebooking, or Tweeting about this giveaway – please leave separate comments with the link.
2. Being or becoming a follower of this blog. - leave a comment saying you became a follower.

Winner will be announced June 5th! Good Luck!

~Lindsey~

5.17.2010

Healthy Oatmeal Cookies

This recipe comes from the USU Extension Food Sense program. Since I will be working
at the extension for the summer, I will share canning tips as I learn more.

Awesome Heart-Healthy Oatmeal Cookies

3/4 c mashed white beans
3 TB canola oil
3/4 c brown sugar
1/2 c granulated sugar
1/4 c egg substitute or 1 egg
1 tsp vanilla
3 c oats (I used rolled quick oats)
1 cup whole wheat flour
1 tsp salt
1/2 tsp soda
1 tsp cinnamon
Optional: Nuts, coconut, raisins, and/or chocolate chips with dry ingredients.

Beat mashed white beans, oil, brown and granulated sugar, egg and vanilla until smooth and creamy.
Combine remaining dry ingredients in a separate bowl and mix together. Add to bean and sugar mixture: mix well.
Drop onto greased cookie sheet and bake at 350*F for 8-12 minutes. Cool on cookie sheet for 5 minutes then transfer to wire rack and cool completely.

Makes about 36 cookies.

Caution about this recipe--mine didn't turn out very well. I used white kidney beans and I am pretty sure these are not the right ones. My other option at the store was white beans with seasoning; pretty sure those wouldn't have been very good either. If you have tried this recipe before, please let me know how to make it work!

I didn't get a picture because my camera is broken. Sorry guys, I haven't done very well this week, but this recipe does have good reviews and I have eaten them before and you can't even taste the beans.

5.03.2010

Knife Covers

I have 2 very nice knives that I absolutely love, but they didn't come with covers or protectors. I wanted to keep them nice and sharp. My Nutrition professor suggested this idea for me.
What you need:
~Cereal Box
~Tape
~Scissors
Optional:
~Fabric- I just used some leftover fabric from a different project
~Glue

Instructions:
Start by measuring your knives. My chef's knife was 8" long and 2" wide. I then drew a rectangle on my cardboard box that was 8 1/4" long and 4 1/2" wide. Then just cut it out, fold it in half and tape it together.

For the optional part, I just cut my fabric a little bit smaller than my piece of cardboard. I glued it in place and waited for it to dry before I folded it in half and taped it.


This is a great way to protect your knives or your little children from the knives!

Additional note: My professor also told me to never spend lots of money on serrated knives, because it's a waste of money. Once they are dull you can't sharpen them. The only things you should be cutting with serrated knives are bread.

4.19.2010

Braided Rosemary Bread


You know when you go to those expensive Italian restaurants and they bring out delicious bread to dip in seasoned olive oil? Well this week I was craving that and also learned a helpful trick in my cooking class. Bakeries are able to make breads with hard outside and soft inside with the use of a steam oven. The trick to making this kind of bread at home is to put a handful of whole ice cubes in the bottom of your oven when you put your bread in. By the time the ice starts steaming, it will produce that hard exterior on your bread.
To start, I just grabbed a cookbook (Good Housekeeping) and looked for the Italian breads. Below is the recipe I used for Braided Herb Bread.
You will need:
1 TB salt
1 TB rosemary
2 pkg or 4 1/2 tsp yeast
about 6 cups flour
2 1/2 cup water
1 TB butter

1. In a large bowl, combine salt, rosemary, yeast and 2 1/2 cups flour. In sauce pan over low heat, heat water and butter until very warn (120-130 F).
2. With mixer at medium speed, gradually beat liquid into dry ingredients. Beat 2 minutes, scraping bowl occasionally. Add 1 cup flour or enough to make a thick batter. Beat 2 minutes on high, scraping bowl occasionally. With spoon stir in 3 cups flour to make a soft, sticky dough. (You don't want to knead it at this point or it will be too tough, just mix in the flour).
3. Place in greased bowl; cover with towel. Let dough rise in warm place, away from draft, until doubled, about 1 1/2 hours.
4. Punch down dough and turn onto a well- floured surface. Knead until smooth and elastic, about 10 minutes. Divide dough into 6 equal pieces; roll each piece into an 18-inch rope. On one side of a large cookie sheet, braid 3 ropes. Repeat with remaining ropes. Cover and let rise in warm place until doubles, about 30 minutes.
5. Preheat oven to 450 F. Bake 30 minutes or until loaves sound hollow when tapped with fingers. Remember to add a handful of ice cubes in the bottom of the oven at the same time you put the bread in. Move to racks to cool.

I recently bought some dipping seasoning from Pampered Chef. It was very delicious with this.

~Linds

4.12.2010

Easter Decorations

Easter has come and gone, and it left a bunch of plastic eggs. I decided to make myself some Easter decorations. All you need is your leftover eggs, a glue gun and stickers.


I arranged mine in a pattern and glued the bottom row together first. Then I glued the top eggs individually to the bottom. Then I added the stickers.


It didn't stand up on its own so I did have to add eggs behind to help it stand up.

I had even more eggs so I decided to make a wreath. All you need for this project are your plastic eggs, a drill, gauged wire (20 or 22 gauge), ribbon and a glue gun just in case.
I started by drilling holes in each end of the egg. Then I threaded them onto the wire. I tied the wire ends together inside of an egg so it would be hidden.
I did add a little glue to help them stay a little better.
Then I added the bow.

I tried using only glue, but they kept breaking apart and it was harder to get them even. By threading the eggs on the wire, it will help it to last longer.

-Lindsey

4.05.2010

Sauteing Veggies

My favorite things to create are wonderful and delicious meals. I am taking a cooking class and have learned many useful tips. The one I probably use the most, a technique that I was doing incorrectly before this class, is sauteing vegetables.
You first have to heat the oil in the frying pan; you will need enough oil to come halfway up your veggies. My favorite vegetables to saute are green beans. When you put your green beans in the pan, you have to make sure the pan isn't too overcrowded or your oil will get cold and your beans will by soggy. They must be served immediately, because they don't hold well.

Roasted Green Beans

1 lb green beans, ends removed or frozen
olive oil
to taste- salt, pepper, garlic, onions

1. Drizzle oil in pan. Allow to heat.
2. Add green beans. For best results, make sure the beans don't overlap too much.
3. Stir occasionally to make sure all the beans get coated with oil. Add seasonings.
4. Taste to test for doneness.

Sorry I don't have any picture for this week, but these green beans go well with almost any dish. And they are way simple.

-Lindsey