7.17.2012

Campfire Orange Cinnamon Rolls

Hey Everyone! Sorry I've taken such a long leave from blogging on here. It's camping season and I really wanted to share this recipe I found. It was so easy and so delicious. I can't wait to try it again. I got this idea off Pinterest, it came from the blog Truly Simple.

What you need:
Oranges
Pillsbury Orange Rolls

Easy enough right?

 Start by slicing the oranges in half and scooping the insides out. Eat the oranges... it will help balance the cinnamon roll part. :) 


Take your cinnamon rolls out or you could use homemade if you're feeling ambitious. Set them in the orange halves and arrange on a baking sheet or a frying pan. Cover in foil.

The time will vary for cooking, just keep an eye on them. Ours took about 20 minutes. 

Then they came out looking like this! 

Spread the frosting on top and voila, you're done! These were soooo good. Perfect little dessert for camping.

6.26.2012

Chore chart

Ahh summer! So fun for the kids to be out of school and to have a little break, but with the break comes a break down in schedules. In in effort to avoid that at our house we've established a visual chore chart. One pocket for each child (and one for mom) contains Popsicle sticks that list the chores. Everyday we check the weekday pocket for our popsicle sticks (color coordinated to match the pockets) to see what today's chores are. Then when the chores are done for the day kids can stash finished chores in a middle pocket!
First I got my tools:
scissors
felt
popsicle sticks
markers
glue gun and glue sticks
Thick cardboard backer (for chore chart)


Then I cut 6 days out (we decided to have Sunday be our rest day from chores)
and then I cut the capital letter for each day of the week
Then using the glue gun I glued the days of the week, a middle pocket, and 4 top pockets. Keep in mind, to make a pocket to only glue around the edges, if you glue in the center...it won't be a pocket. (I did for get this at first and we had to tear the weekdays off and try again)
Then using markers I colored the sticks to match each child and with a black felt tip marker wrote the specific chores for each child that they are responsible for.
Viola!
I am also going to be creating reward cards for optional chores. (20 minute media cards, treat cards, 1.00$....)

6.05.2012

Felt car track

I had two girls before I had a boy and really hadn't needed a felt car track (I'd say we're still a way off before we really need this...) but my oldest recently went to a birthday party where her friend was having a car themed party.  So we made him a car track!  At Walmart felt can be purchased in sheets, all plain white or multi-colored.  I got one with white sheets and one with colored to make all that I need here.  I used 3 sheets to make the track and one white sheet to be folded and compartmentalized for the car storage.

Step 1.  
Sew the three sheets together (one sheet [brown and green] sew the short ends together and the other sheet[green and off white] sew the long ends together.)   This makes is easier to fold the track up together for easy storage and portability.  

Step 2.
Take the white sheet and fold it in half.  Sew the edges.  Then mark 4 lines (with a pencil) that are evenly spaced apart.  (this is where you will keep the cars-hot wheels size)
Step 3.
Sew the whit half sheet on the edge of the off white sheet.
Step 4.
With a pencil or fabric marking pencil (you can use a permanent black marker but be sure not to make mistakes!) to mark out the road path on the off white sheet, the green sheet and the brown sheet.  I drew a map before hand on a separate paper so I knew more accurately what I wanted to draw.  Then paint on the road.  I used acrylic paint which was a mistake since it just soaked into the felt and took forever to dry.  Use fabric paint or just permanent marker.  The green and brown fabric is marker and the off white is paint.  If you choose you can also paint yellow dotted lines in the road.  
Step 5.
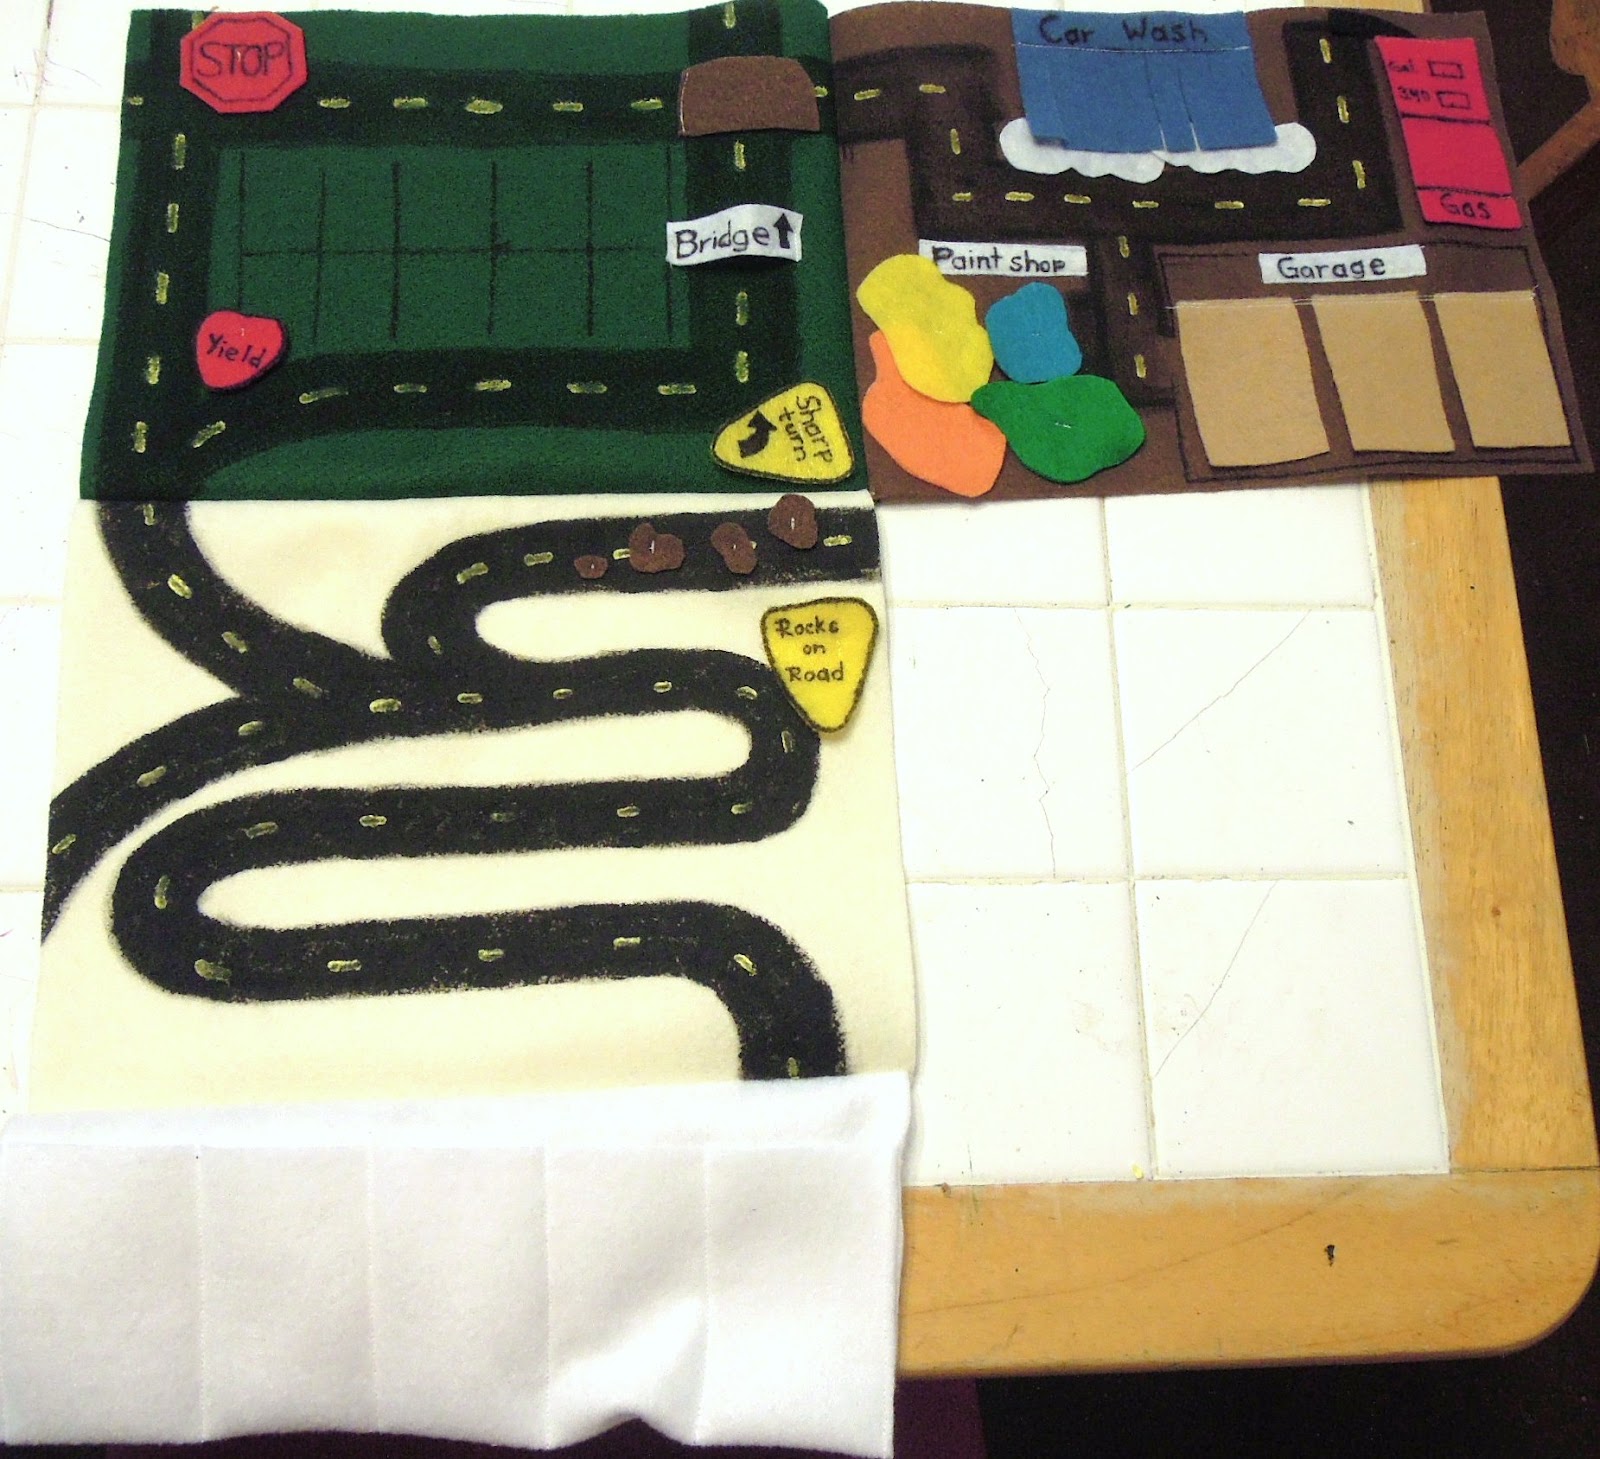
The brown sheet I used not as a road but a stop for the cars.  One is a car wash, one is a paint shop, a gas station, and one is a garage.  For the car wash I cut a large blue square and cut strips in it.  Then I cut two white strips that resemble bubbles of soap.  I used a felt tip marker to write car wash across the top and to add bubble detail to the white.  I sewed the blue and the white felt onto the sheet in a couple little places trying to make it look not too obvious with the stitching.  For the paint shop I cut 4 different colors (try to make them bright colors) and tacked them on with the sewing machine.  Then using a felt tip maker added details.  I cut two white signs for the garage and the paint shop then sewed them on.  For the garage I cut little brown strips to resemble parking spaces.  I considered making little pillows and blankets for the cars but decided that might be taking it a little too far.  Maybe next time.  Lastly the gas station.  I cut a large red square and used a marker to add detail and make it look like a gas pump.  Then I cut a black hose for the car to back up to and gas up.  
Step 6.
For the green sheet I made it a roadway with all the traffic signs.  I used yellow for warnings (Sharp turn), and red for the stop sign and the yield.  I used white to indicate the upcoming bridge and only sewed the bridge on one side so that cars can go over the bridge or under it.  The center of the green sheet is a parking lot, simply marked out with a felt tip permanent marker.
Step 7.  Lastly the off white sheet is mostly curving roads for the cars to play on if they just want to drive.  one off road leads to a dead end and the other off road has a sign indicating rocks on the road and then several brown rocks on the road.  These were tacked on with the sewing machine.  

The cars can be tucked into their compartments, the sheets folded, and the whole track easily carried around for long drives, church meetings or waiting at the doctor!


5.15.2012

Going from long sleeve to short sleeve

My husband and I have been in the military life for about a year and a half now and with that comes relocating to new climates on a regular basis.  I grew up in the mountains and always had a closet full of long sleeve shirts but I'm learning that while we're in the military it might be a good idea to have only short sleeve shirts and many cute sweaters!  In any case, if you have a shirt with long sleeves that you would like to make short sleeves here is a simple tutorial.  The shirt I'm using is great for this because it comes with cuffs on the end of the sleeve.  
 First I found a shirt in my closet that I wanted for my sleeve length.  Then I compared the length on the shirt and marked it on one sleeve.  Then I folded the shirt in half and cut both sleeves simultaneously. (to ensure that the sleeves matched in length)
 I then removed the cuffs with a seam ripper.  I would not recommend doing this without a seam ripper as pulling on the string or using scissors can damage the material.
 I then took the cuffs and pinned them to the bottom of my new sleeve length.  (Pin right sides together)
 Then sew the cuff on the sleeve.
And voila!


In retrospect I cut the sleeve length a little too long for my preference.  I measured at the bottom of the sleeve from the other shirt and that is incorrect because I didn't take into consideration the length of my cuffs and the sewn hem.  But I now have a quarter length sleeve and I still like the result!  

5.04.2012

Faux Bead Board Chunky Frame....

I have always liked the look of bead board. I've seen frames with bead board in them or made from bead board itself, but when I went to look at bead board at the home improvement store I realized I had a few problems. First, it comes in a big sheet, so I would need a big vehicle to get it home. Second, trying to wrestle it out of the truck alone once I got home. (I guess my 4 and 2 year old would be really helpful too) Third, it is really big and I wasn't sure how to cut it without having a table saw.

So, one night I was thinking about it and I came up with an idea. Make my own bead board look-a-like using paint sticks and bamboo skewers! I tried it and it totally worked! Here is a look at the finished product:
 This is an 8x10 frame, I pulled out the glass, then measured and cut the paint sticks. (I got these from Walmart, obviously, and the paint guy just gave them to me--he thought I was a little crazy, but I don't care.) I cut the paint sticks using a utility knife, just score each side and then break the end off. Same with the bamboo skewers (they come in a pack of like 100 for $1).

Then I lined them up in the frame; paint stick, skewer, paint stick, skewer.... and so on. The last paint stick had to be trimmed a little, but I just used the utility knife for that too. Then I glued them in using hot glue. Replaced the back of the frame. Then painted and distressed the whole thing.

I wanted the chunky layered frame look, but I wasn't sure how to attach the other frame to the front without making it too permanent--I like to switch out pictures a lot. And then I had a somewhat brilliant idea!
VELCRO! Yup, sticky back velcro dots. I put the scratchy side on the small frame and soft side on the faux bead board. It works GREAT! I can swap out the pictures whenever I want, the 2nd frame stays put and it was hard or complicated! I love how they turned out---I actually made 3 for our mantel.


5.02.2012

Diaper cake...again

I have featured a diaper cake before in one of my posts but since then I have changed a couple things and thought I'd post this diaper cake I made recently.  The last diaper cake I gave out I covered with cute pink fabric and when I gave it to the soon to be mother she excitedly asked me if the fabric was a baby blanket.  I sheepishly answered that it was just fabric for aesthetic purposes.  And that was when it occurred to me, why not make blankets to cover the diapers?  So the green striped and polka dotted fabric are receiving blankets, which makes this gift that much cooler for a baby shower!  The cake topper includes a baby bowl, baby spoon (that turns white when food is too hot!) and baby socks and 3 diapers tied with twine.  Th second layer has baby shampoo and lotion, two baby bottles, a pacifier, and bottle cleaner.  The third layer has diaper rash cream, and gas drops.  Personally the diaper cake would look much cuter without all the add ons dangling from the side....but when it comes to baby showers I think more is always better. New moms can attest that some supplies were invaluable and so I always try to include those essentials with my gifts.  Nothing says welcome to motherhood (in a helpful way) like gas drops, diapers, and a bottle cleaner!  (in my opinion!!!)  I hope you enjoy!


3.30.2012

The Sock Sack...

As our family has grown so has the abundance of lost socks. It drives me crazy to have all the laundry done and find I still have a basket of socks without their match. Likewise, it drives me crazy to find a dozen socks under my boys bed, behind the couch, in the sandbox, or in the bottom of my pantry! When have dirty socks ever gone in the pantry?! 

So, here is my new solution to the problem, The Sock Sack. Everyone has their own sock sack, when you take off your socks, you put both socks into your sack. When the sack is getting full, zip it closed and throw the entire thing into the washer and dryer. All pairs SHOULD be accounted for. Which SHOULD make for easy folding and putting away. And I can't even wait to try it out on tiny little baby socks!

We started this routine this week and so far it has been a hit. My boys even spent an entire morning searching for my dirty socks to put in their sack. I think I will eventually make a little fabric tag for each sack, but for right now this works great!

I found our sock sacks at Walmart in the laundry basket/ironing board aisle. These are the Mainstays Brand and they were 97 cents each. There was a Tide version, but they were like $4 each. I couldn't see any reason why these wouldn't work just as well and haven't had any trouble yet. 

Hopefully, this will simplify our sock problem, do you have any time saving laundry tricks? Have a great weekend!